Falling from a tree stand is the leading cause of serious injury and death in elevated hunting. Shockingly, 99% of hunters who fall aren’t wearing a safety harness, and 75% of those falls happen during entry or exit—the very moments when many feel “too close to the ground” to clip in. That false sense of security kills. A hunting harness isn’t just gear—it’s your lifeline. When used correctly, it keeps you attached to the tree from the second your feet leave the ground until they touch earth again. This guide shows you exactly how to use a hunting harness safely, including how to wear it, attach it, move freely, and survive a fall. You’ll learn not just what to do—but why each step could save your life.
Choose the Right Full-Body Harness

Full-Body vs. Chest-Style: Only One Is Safe
Never use a chest-style harness for tree stand hunting. Only a full-body hunting harness prevents inversion and reduces injury during a fall. It distributes impact across your chest, shoulders, hips, and legs—keeping you upright and alive.
❌ Chest harnesses are deadly: They can flip you upside down, cutting off blood flow and triggering fatal suspension trauma within minutes.
Modern full-body models like the Muddy Crossover, Hunter Safety System (HSS) Harness, or Muddy Magnum are engineered for both safety and comfort. They feature padded straps, breathable mesh, and multiple D-rings for accessories. Always look for a harness with a back D-ring—this is where your tether connects.
Pick Your Style: Minimalist or Vest-Style?
| Feature | Minimalist Harness | Vest-Style Harness |
|---|---|---|
| Weight | Lightweight, low profile | Slightly heavier |
| Storage | Limited | Pockets for calls, phone, tools |
| Comfort | Great for short sits | Better for all-day hunts |
| Best For | Mobile hunters, spot-and-stalk | Stand hunters, cold-weather sits |
Both styles offer identical life-saving protection when worn correctly. Choose based on your hunting style, not convenience.
Put On the Harness Correctly
Shoulder Straps: Outside, Not Across the Chest
One wrong move while putting on your harness can make it fail. Follow these steps:
- Unbuckle the front chest clip
- Slide shoulder straps over your head, letting them fall on the outside of your body (not crossing your chest)
- Reconnect the front buckle—pull tight and check it’s locked
- Attach leg straps around your thighs (not calves), snug but not cutting circulation
- Double-check all buckles and straps—no twists, slack, or misrouting
⚠️ Critical Mistake: Wearing shoulder straps across the chest shifts fall forces to your neck and spine. Always wear them on the outside.
Test fit before every hunt. Your harness should be tight enough that you can’t slide a hand between strap and body. If it’s loose, it won’t protect you.
Attach to the Tree Securely
Clip In Before You Climb
The most dangerous moment? Stepping onto the stand. That’s why you must be attached before leaving the ground. Use one of these proven methods:
Use a Tree Strap with Head-Level Carabiner
- Wrap included nylon strap around the tree
- Adjust so the carabiner hangs at head height when standing
- Clip to the D-ring on your back
✅ Ensures short fall distance if you slip
❌ Noisy metal buckles can spook game
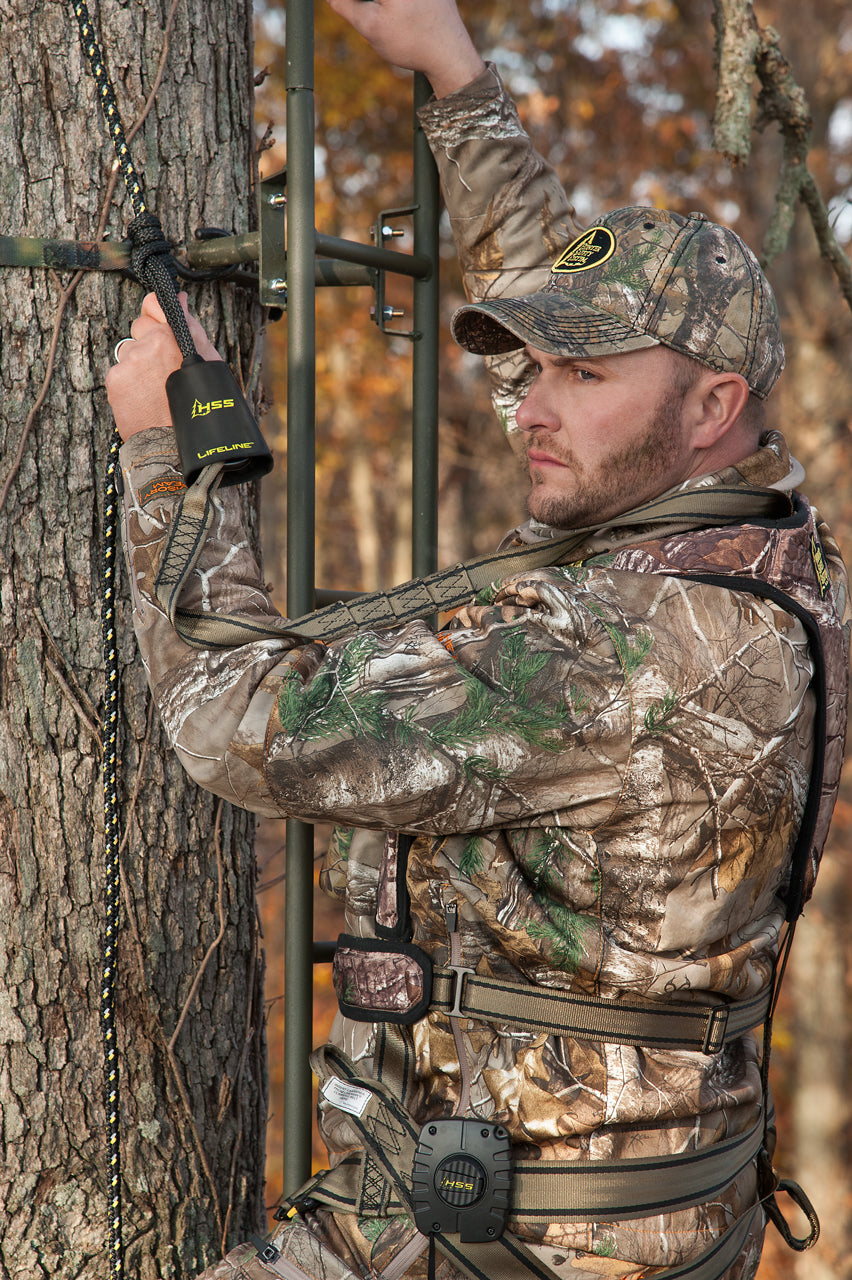
Upgrade to a Rope with PRC Knot
A rope-style tree strap with a PRC (Progress Capture) knot lets you adjust silently and smoothly:
- Wrap rope around the trunk
- Tie a PRC knot with a carabiner
- Slide knot up or down to set height
- Clip to your harness D-ring
🔧 The PRC knot locks under load—your tether won’t slip
This method works quietly and allows full shooting clearance.
Install a Quick Connect System (Best for Permanent Stands)
For hunters using fixed stands, the Hunter Safety System Quick Connect is the gold standard:
- Install a heavy-duty strap on the tree once
- Clip in and out in seconds
- Stay attached during entry and exit
💡 “It’s fast, quiet, and safe—I clip in before stepping up, unclip after stepping down.” — verified hunter
Use a Lifeline for Continuous Protection
Why Most Hunters Get It Wrong
Most hunters only clip in after reaching the stand. But 86% of falls happen during climbing or exiting—when they’re unattached. That’s why a lifeline system is non-negotiable.
How a Lifeline Works
- A rope runs from the base of the tree to above the stand
- Equipped with a sliding PRC knot and carabiner
- You stay clipped in the entire time
As you climb, you slide the knot up with you. No exposure. No risk.
🛡️ Systems like Muddy Safe-Line or HSS Lifeline make this easy to set up and reuse.
Adjust Tether for Safety and Mobility
Set Carabiner at Head Level
Your tether should be short enough to prevent a serious fall:
- Carabiner at head height when standing
- Less than 6 inches of slack when seated
- Allows you to pivot 360°
✅ Test: Sit in your stand and tug up on the tether. You shouldn’t rise more than a few inches.
Maximize Shooting Range
Use a looser PRC knot setting when drawing a bow:
- Slide the knot higher on the rope
- Gives extra clearance for full draw
- Return to snug setting when not shooting
🎯 Safety doesn’t mean being frozen in place. You should be able to aim and shoot freely.
Prevent Suspension Trauma
What Happens After a Fall
Even if you survive the fall, suspension trauma can kill in 15–40 minutes. When hanging vertically, blood pools in your legs, starving your heart and brain.
🚨 Unconsciousness can occur in under 15 minutes—faster in cold weather.
Use a Suspension Relief Strap
This small strap saves lives. Here’s how:
- Clip it to the bottom back loop of your harness
- Step into the lower loop
- Stand up straight, using your upper harness for balance
- This restores blood flow and buys time for rescue
⚠️ Practice before you need it. Adjust the slide bar at home—never while hanging.
Store the strap in your harness pocket, not in your backpack.
Follow the Pre-Climb Safety Checklist
Inspect Everything Before Every Hunt
| Task | Why It Matters |
|---|---|
| ✔️ Check harness for frays, rust, or damaged buckles | Webbing weakens over time, especially after UV exposure |
| ✔️ Test tree stand bolts, welds, and platform | Even new stands can fail—inspect every time |
| ✔️ Replace straps every 2–3 years | Nylon degrades even if it looks fine |
| ✔️ Attach lifeline to the tree, not the stand | A falling stand won’t pull you down |
| ✔️ Clip in before stepping on the stand | Eliminates transition risk |
| ✔️ Use a haul line for gear | Never carry bow, rifle, or pack while climbing |
| ✔️ Carry whistle, phone, or radio | Sound carries farther than voice |
| ✔️ Tell someone your location and return time | Accountability saves lives |
🧰 Pro Tip: Practice your full setup in your backyard. Speed and confidence come from repetition.
Maintain Your Gear Regularly
Inspect Before Every Use
A harness failure is often silent—no warning until it’s too late.
What to Look For:
- Tears or fraying in webbing
- Rust or cracks in buckles and D-rings
- Brittle or stiff straps (sign of UV damage)
- Sticky or broken carabiners
When to Replace:
- Harness: Every 5–7 years, or after any fall
- Tree straps and ropes: Every 2–3 years, even if they look good
- Lifelines: Immediately if frayed or cut
🔍 Real case: A hunter found a broken weld on a stand less than a year old—proving gear fails unexpectedly.
Hunt Smart: Best Safety Practices
Never Carry Gear While Climbing
Use a haul line like the Muddy EZ Twist Rope to pull up your bow, rifle, or pack. Climb with empty hands.
Use Three Points of Contact
Always maintain:
– Two hands + one foot, or
– Two feet + one hand
This keeps you stable on ladders and climbing sticks.
Avoid Excessive Height
15–25 feet is ideal:
– Safer fall distance
– Better shot angles
– Less wind movement
Climbing higher doesn’t improve odds—it increases risk.
Stay Alert and Awake
Fatigue, cold, or drowsiness dulls reaction time. Never sleep in your stand—one hunter fell after his chest strap loosened while dozing.
Always Be Accountable
- Tell someone your exact location and expected return time
- Leave a note in your vehicle if hunting alone
- Carry a whistle—it can be heard over a mile in quiet woods
Prepare for Emergencies
What to Do If You Fall
- Stay calm — Panic speeds up suspension trauma
- Deploy your suspension relief strap immediately
- Signal for help — Blow your whistle in sets of three
- Do NOT unclip — You could fall further
- Wait for rescue — Even if you feel fine, internal injuries may be present
🚨 Suspension trauma is silent and deadly. Acting fast is your only chance.
Make Safety a Habit
Safety Isn’t Optional—It’s Survival
Tree stand hunting is rewarding, but only if you come home. Make these habits automatic:
- Always wear your harness—from ground to stand and back
- Use a lifeline—no unsecured climbing
- Inspect gear every time—assume nothing is safe
- Practice your system—familiarity saves lives
- Prioritize safety over speed—no buck is worth your life
💬 “Wearing a harness is like a seatbelt. It’s an annoyance—until you need it. Then, it’s everything.”
Your harness, suspension strap, and lifeline aren’t expenses. They’re life insurance for you and your family.
Final Note: Using a hunting harness correctly means more than just strapping it on. It means staying attached at all times, preparing for emergencies, and treating safety as non-negotiable. Follow these steps every time—and hunt with confidence, knowing you’ve done everything to come home safe.


0 Comments