Learning how to make hunting traps can be a game-changer in a survival situation. When food is scarce and energy is limited, a well-built trap acts as a silent hunter—working while you rest, travel, or focus on shelter and fire. These primitive tools have sustained humans for millennia, turning forests, fields, and streams into renewable food sources with minimal effort.
But here’s the reality: most traditional hunting traps are illegal to use today in the U.S., Canada, and Europe. Modern wildlife laws prohibit inhumane or indiscriminate trapping methods to protect animal welfare and ecosystems. This guide is not for casual hunting or poaching—it’s for survival training, emergency preparedness, and educational purposes only. Use this knowledge responsibly, ethically, and legally.
In this comprehensive guide, you’ll learn how to make hunting traps using natural materials and portable gear. From spring-powered snares to gravity-driven deadfalls and simple bottle fish traps, we’ll cover designs proven in the wild. You’ll master trigger mechanisms, baiting strategies, placement tactics, and essential safety rules. Whether you’re a bushcraft enthusiast, prepper, or outdoor educator, these skills deepen your connection to nature and boost self-reliance in emergencies.
Build Spring-Powered Snare Traps for Small Game
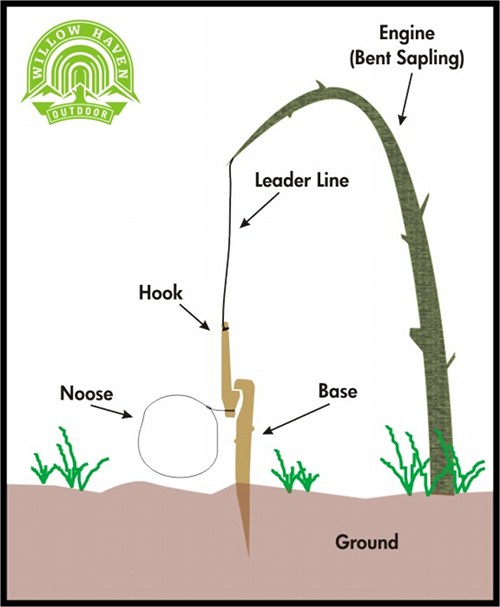
Spring snares use the tension of a bent sapling to lift or tighten a noose when triggered. These are among the most effective how to make hunting traps solutions for rabbits, squirrels, and birds—delivering quick, silent kills with minimal materials.
Construct a Basic Spring Snare
This trap uses only wood and cordage, making it ideal for wilderness survival.
Materials:
– Flexible sapling (6–8 ft tall)
– Two crooked anchor sticks (12–18 inches)
– Trigger stick (6–8 inches)
– Cordage (paracord, wire, or natural fiber)
– Swivel twig (optional, prevents line twist)
Steps:
1. Drive the two anchor sticks into the ground at 45° angles, 20 inches apart.
2. Bend the sapling down and tie a cord to its base.
3. Place the trigger stick horizontally between the anchors.
4. Attach the sapling’s cord to the trigger.
5. Form a slip-knot noose and position it over the trigger.
6. When an animal steps into the loop, the trigger releases—the sapling snaps up, lifting the prey off the ground.
Pro Tip: Insert a swivel twig where the snare line connects to the sapling to prevent twisting and jamming.
Set the Grave’s Bait Stick Snare
Named after bushcraft legend Richard Graves, this design uses a toggle system for reliable activation.
Setup:
1. Tie a snare line to a bent sapling.
2. Drive a forked stake into the ground where the sapling touches when pulled down.
3. Slide a toggle stick under the fork.
4. Attach a baited stick to the toggle’s end.
5. Position the snare loop over the bait.
How It Works: Animal tugs bait → toggle slips → sapling rises → noose tightens around neck or body.
Warning: Never touch the set noose with bare hands. Even a small sapling can amputate a finger.
Use a Treadle-Triggered Snare on Animal Trails
This motion-activated design doesn’t need bait—ideal for high-traffic game paths.
Components:
– Spring pole (bent sapling)
– Treadle stick (flat, 8–10 inches)
– Toggle and support stick
– Snare line and loop
Assembly:
1. Pull the sapling down and connect it to a toggle resting on a support stick.
2. Place the treadle stick under the toggle’s end.
3. Position the snare loop beside the treadle.
Result: Animal steps on treadle → pressure dislodges it → toggle drops → snare closes instantly.
Best Placement: Narrow trails between brush, near burrow entrances, or feeding zones.
Build Gravity-Powered Deadfall Traps
Deadfall traps crush or pin animals under heavy logs or rocks. When properly constructed, they deliver a fast, humane kill—especially effective for rodents and small mammals.
Assemble the Figure-Four Deadfall
This classic design uses three sticks arranged like the number “4” to balance a flat rock.
Materials:
– Three hardwood sticks (~1” thick, 12” long)
– 10–20 lb flat rock
– Bait (peanut butter, oats, sardines)
Steps:
1. Carve a screwdriver-shaped tip on the vertical stick’s bottom.
2. Notch the diagonal stick near one end; point the other.
3. Notch the horizontal (bait) stick at one end.
4. Assemble: vertical stick upright, diagonal across it, bait stick horizontal.
5. Place the rock on the diagonal’s free end.
6. Bait the tip of the horizontal stick.
Trigger: Animal pulls bait → structure collapses → rock falls instantly.
Ideal For: Mice, rats, chipmunks—avoid using on larger animals.
Set the Piute Deadfall for Maximum Sensitivity
One of the most sensitive gravity traps, the Piute (or Paiute) deadfall responds to the lightest tug.
Parts:
– “Y”-shaped post (8”)
– Lever stick (9”)
– Thin toggle (2”)
– Bait stick (12”)
– 8” string
– 5–10 lb flat rock
How to Build:
1. Tie string between lever and toggle.
2. Rest lever in the “Y” fork.
3. Lift rock onto lever’s tip.
4. Wrap toggle halfway around the post.
5. Place baited end of bait stick between rock and toggle.
Action: Even slight movement releases the rock—perfect for prairie dogs or rats.
Pro Tip: Elevate the bait slightly so the animal must climb or stretch, increasing trigger reliability.
Build the McPherson Spring Deadfall
This hybrid trap combines spring tension and gravity for explosive power.
Mechanism:
– A bent sapling holds a sharpened toggle under tension.
– Bait is placed on the toggle.
– When pulled, the sapling yanks a support stick—releasing a deadfall.
Advantage: Faster and more reliable than passive gravity traps. Ideal in areas with cautious, bait-shy animals.
Construct Box Traps for Live Capture
Box traps are humane, reusable, and excellent for catching rabbits or squirrels alive—perfect for survival scenarios where you need to relocate or observe animals.
Build a Wooden Rabbit Box Trap
Materials:
– 1” x 10” boards (three 28”, one 24”, one 11”)
– Hardware cloth (for back panel)
– Paracord, screws, nails
– Saw, drill
Steps:
1. Assemble a box using three long boards (bottom + two sides).
2. Attach hardware cloth to the back for ventilation.
3. Drill a 1” hole in the top, 6” from the back.
4. Install door rails inside the side walls.
5. Fit an 8” wide sliding door.
6. Add 12” uprights and a pivot handle.
7. Connect a trigger arm via paracord to the door.
Baiting:
– Use apple or carrot for rabbits.
– Place bait at the far end to ensure full entry before triggering.
Test: Pull the trigger—door should drop instantly.
Legal Note: This trap may be legal for live capture in some areas—always check local regulations.
Make Fish and Bird Traps
Expand your food options with aquatic and avian designs.
Create a Plastic Bottle Fish Trap
Simple and effective—ideal for shallow streams or ponds.
Steps:
1. Cut a 2-liter bottle horizontally where the body meets the neck.
2. Invert the top and insert into the bottom (funnel facing in).
3. Secure with tape or screws.
4. Add pebbles for weight.
5. Place bait (worms, hotdog, cereal) inside.
6. Submerge with funnel just below water.
How It Works: Fish swim in through the funnel but can’t find the exit.
Pro Tip: Drag it slowly through fish-heavy areas for better results.
Set an Ojibwe Bird Snare
Designed for crows or jays, this spring-powered snare lifts birds off perches.
Setup:
1. Run cord through a vertical support with a guide hole.
2. Tie one end to a sapling, the other to a snare loop.
3. Place a trigger stick across the cord.
4. Position bait at the perch center.
Activation: Bird lands → weight disturbs trigger → sapling snaps → bird lifted.
Best Height: 3–5 feet off the ground.
Use Drowning Snares Near Water
In wet environments, drowning snares offer a fast, clean kill—especially useful in cold weather when meat stays fresh.
Deploy a Drowning Snare
Materials: Snare wire, heavy rock, float stick, prop stick.
Steps:
1. Tie snare line to a large rock.
2. Attach a float to the free end.
3. Position noose in an animal trail leading to water.
4. Prop the rock so it’s ready to fall.
5. When animal pulls noose, rock drops—dragging it underwater.
Float Purpose: Marks the location for easy retrieval.
Ethical Rule: Check traps daily—never leave animals to suffer.
Master Trigger Mechanisms
The success of any trap depends on its trigger. A misaligned notch or weak tension means bait theft and missed catches.
| Trigger Type | Best For | Sensitivity |
|---|---|---|
| Bait Stick | Figure-4, Grave’s Snare | Medium |
| Toggle | Piute, McPherson | High |
| Treadle | Animal Trails | Medium |
| Greasy String | Rodents | Low |
| T-Bar | Secure Snares | High |
Critical Tip: Always test triggers with a stick before live use.
Optimize Bait and Placement
Match Bait to Target
| Animal | Best Bait |
|---|---|
| Rabbit | Apple, carrot, broccoli |
| Squirrel | Peanut butter, nuts |
| Rodent | Oats, sardines |
| Bird | Birdseed, peanuts |
| Fish | Worms, hotdog |
Placement Tips:
– Place bait at the back of box traps.
– Elevate bait in Piute traps.
– Scatter scent trails with crushed seeds.
Avoid Human Scent: Wear gloves or dust hands with charcoal.
Follow Safety, Ethics, and Legal Rules
- Never touch a set snare—use a stick to disarm.
- Check traps daily—ethical and legal requirement.
- Dispatch quickly if harvesting for food.
- Most traditional traps are illegal—use only for survival training or education.
Build a Survival Trapping Kit
Must-Haves:
– 12+ small snares (1/16” steel cable)
– 3–5 large snares (3/32”)
– MRE peanut butter, sardines
– Knife, saw, screwdriver
– Charcoal (for scent control)
Practice at Home before heading into the wild.
Final Note: Knowing how to make hunting traps is a powerful survival skill—but with great power comes responsibility. Use these methods to learn, prepare, and respect nature—not to harm. Whether you’re building a Piute deadfall or a bottle fish trap, your goal should always be efficiency, humanity, and legality. Master these techniques not to dominate the wild, but to survive within it—wisely and ethically.


0 Comments