You just fired a shot at a mature buck in thick woods. He staggers but doesn’t drop. Your rifle is empty. What do you do next? The answer lies in how to reload a hunting rifle—but first, you need to know which type of reload matters right now.
The phrase “reloading a hunting rifle” actually refers to two distinct skills:
1. Field reloading – cycling your rifle’s action after a shot for a fast follow-up.
2. Ammunition reloading (handloading) – building your own rounds at home.
Both are essential for serious hunters. One keeps you ready in the moment. The other saves money, ensures supply, and improves accuracy over time. This guide covers both, with precise, step-by-step instructions, safety warnings, and proven techniques drawn from real-world hunting and reloading experience.
You’ll learn how to avoid dangerous short-stroking, reload under pressure, and handload accurate, affordable ammunition tailored to your rifle—all without guesswork.
Field Reloading: Reload After the Shot
In high-stakes hunting situations, seconds matter. A wounded animal may vanish into thick brush—or charge. Your ability to reload quickly and safely could mean the difference between success and disaster.
Why Short-Stroke Reloading Is Dangerous
Short-stroking happens when the bolt isn’t fully cycled, leaving the spent casing stuck in the chamber. When you try to chamber a new round, both cartridges stack inside the action. This creates a high-pressure blockage that can destroy your rifle and injure you.
- 45–50% of reloads fail due to short-stroking in high-pressure scenarios.
- Most common in magnum-length actions, which require longer bolt travel.
- Never assume the casing ejected—always verify.
⚠️ Critical Rule: If you don’t see the brass fly out, it’s still in the chamber. Stop. Clear it manually.
Break Contact: Remove Rifle from Shoulder
After firing, immediately drop the rifle from your shoulder. This simple move gives you clear line of sight to the ejection port.
- Keeps your head free of the stock.
- Allows visual confirmation of ejection.
- Prevents blind reloading under stress.
This is the first step in building muscle memory for reliable field reloads.
Open Bolt with Full Travel
Use a firm, aggressive motion to pull the bolt fully rearward.
- Watch the ejection port—confirm the spent casing clears.
- If it doesn’t eject, remove it with your finger.
- Don’t rush. A clean ejection prevents jamming.
💡 Pro Tip: Practice this motion dry-fire at home until it’s instinctive. Speed comes from confidence, not haste.
Confirm New Round Is in Position
As you begin to close the bolt, glance down quickly to ensure:
– A fresh cartridge has been lifted from the magazine.
– It’s aligned with the chamber.
This split-second visual check prevents misfeeds and double-feeds.
Close Bolt with Audible Lock
Push the bolt forward with full, forceful motion. Listen for the solid click that confirms it’s locked.
- No sound? The bolt may not be fully closed—do not fire.
- Feel the resistance—a smooth, full closure means it’s seated.
- Only after hearing and feeling the lock should you return the rifle to your shoulder.
📌 Remember: “The loudest, most dangerous sound in Africa is the silence after a failed bolt closure.”
Ammunition Reloading: Build Your Own Rounds
Handloading isn’t just for hobbyists—it’s a smart, cost-effective strategy for hunters who want better accuracy, lower costs, and supply security.
Save 50% on Hunting Ammo
Factory hunting rounds cost ~$2.00 per round. Reloaded rounds can cost under $1.00.
| Component | Cost (USD) |
|---|---|
| Bullet (e.g., 165-grain .308) | $0.50 |
| Powder (per charge) | $0.36 |
| Primer (large rifle) | $0.09 |
| Total per round | $0.95 |
- Initial equipment pays for itself after ~200 rounds.
- During ammo shortages (like 2020–present), reloaders kept hunting while others waited.
💡 Stockpile early. Components sell out fast during crises.
Customize for Maximum Accuracy
No two rifles shoot the same. Handloading lets you tune your ammo to your barrel.
You control:
– Bullet type (Nosler AccuBond, ELD-X, SST)
– Powder charge (within safe limits)
– Seating depth (distance to lands)
– Overall length (COAL)
Even small adjustments can shrink groups from 1.5 MOA to 0.5 MOA—critical at long range.
Essential Reloading Equipment
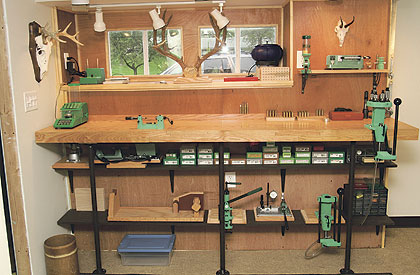
Start with a single-stage press—it’s slower but more precise and safer for beginners.
Must-Have Tools
Single-Stage Press
- Best for small batches (20–50 rounds).
- Allows full attention to each step.
- Brands: RCBS, Lee, Hornady.
Caliber-Specific Dies
- Includes resizing/de-priming, bullet seating, and crimping dies.
- Must match your cartridge (e.g., .30-06, 280 AI).
Case Tumbler
- Cleans fired brass using corn cob media.
- Removes carbon and grit that can damage dies.
Powder Scale (0.1 Grain Precision)
- Non-negotiable for safety.
- Always weigh every charge—volume ≠ weight.
Powder Trickler
- Fine-tunes powder drops to exact grain weight.
- Prevents over- or under-charging.
Digital Calipers
- Measures case length, COAL, and seating depth.
- Essential for consistency.
Primer Tool
- Hand primer or press-mounted.
- Ensures consistent, safe primer seating.
💡 Hot Tip: Buy a complete reloading kit (e.g., Hornady, Lee) to save 20–30% vs. individual tools.
Step-by-Step Ammo Reloading Process
Follow these nine steps to build safe, accurate hunting rounds.
Step 1: Clean the Brass
- Load brass into a vibratory or rotary tumbler.
- Add cleaning media and polish.
- Run for 1–2 hours until shiny and residue-free.
- Why? Dirty brass can jam in the press or contaminate powder.
Step 2: Inspect Every Case
Check each piece for:
– Cracks or splits at the case mouth
– Bulges or dents
– Pitting or corrosion
Discard any damaged cases. Firing a cracked case can rupture the chamber.
⚠️ Never reuse range-pickup brass without thorough inspection.
Step 3: Resize and De-Prime
- Apply light case lube to the body (not the neck).
- Insert case into shell holder.
- Raise handle to push case into resizing die.
- The die:
- Returns brass to factory dimensions.
- Pushes out the spent primer.
Follow die instructions for correct setup.
Step 4: Trim Cases to Correct Length
Fired brass expands and lengthens.
- Measure each case with calipers.
- Compare to maximum length in your reloading manual.
- If too long, trim to “trim-to” length.
Example:
– .308 Win. max = 2.015″
– Trim-to = 2.005″
Use a hand-crank case trimmer for precision.
Step 5: Deburr and Chamfer
After trimming:
– Use a deburring tool to remove sharp edges.
– Chamfer the inside and outside of the case mouth.
– Ensures smooth bullet seating and prevents cuts.
Step 6: Prime the Cases
- Use a hand priming tool.
- Seat large rifle primers (standard for hunting calibers).
- Always point case away from your face.
- Ensure primer is fully seated and flush.
⚠️ Never hammer a primer. It can ignite prematurely.
Step 7: Charge with Powder
This is the most dangerous step—precision is vital.
- Consult reloading manual (Hodgdon, Nosler, Sierra).
- Find safe charge range for your bullet and powder.
- Example: 165-grain .308 with Varget → 42–46 grains.
Process:
1. Use powder scoop to dump close to target.
2. Use powder trickler to adjust to exact weight.
3. Use scale to verify every charge.
❌ Never exceed max charge. Overpressure can blow up your rifle.
Step 8: Seat the Bullet
- Adjust bullet seating die for correct COAL.
- COAL is listed in reloading manual per bullet type.
- Use calipers to check first few rounds.
- Adjust die until length is consistent.
📌 Tip: Start with .020″–.030″ off the lands—a safe, accurate starting point.
Step 9: Optional Crimping
- Recommended for semi-autos—prevents bullet setback.
- Optional for bolt-actions—minimal movement in magazine.
- Use roll crimp or taper crimp die.
- Avoid over-crimping—it increases pressure.
Load Development: Find Your Rifle’s Sweet Spot
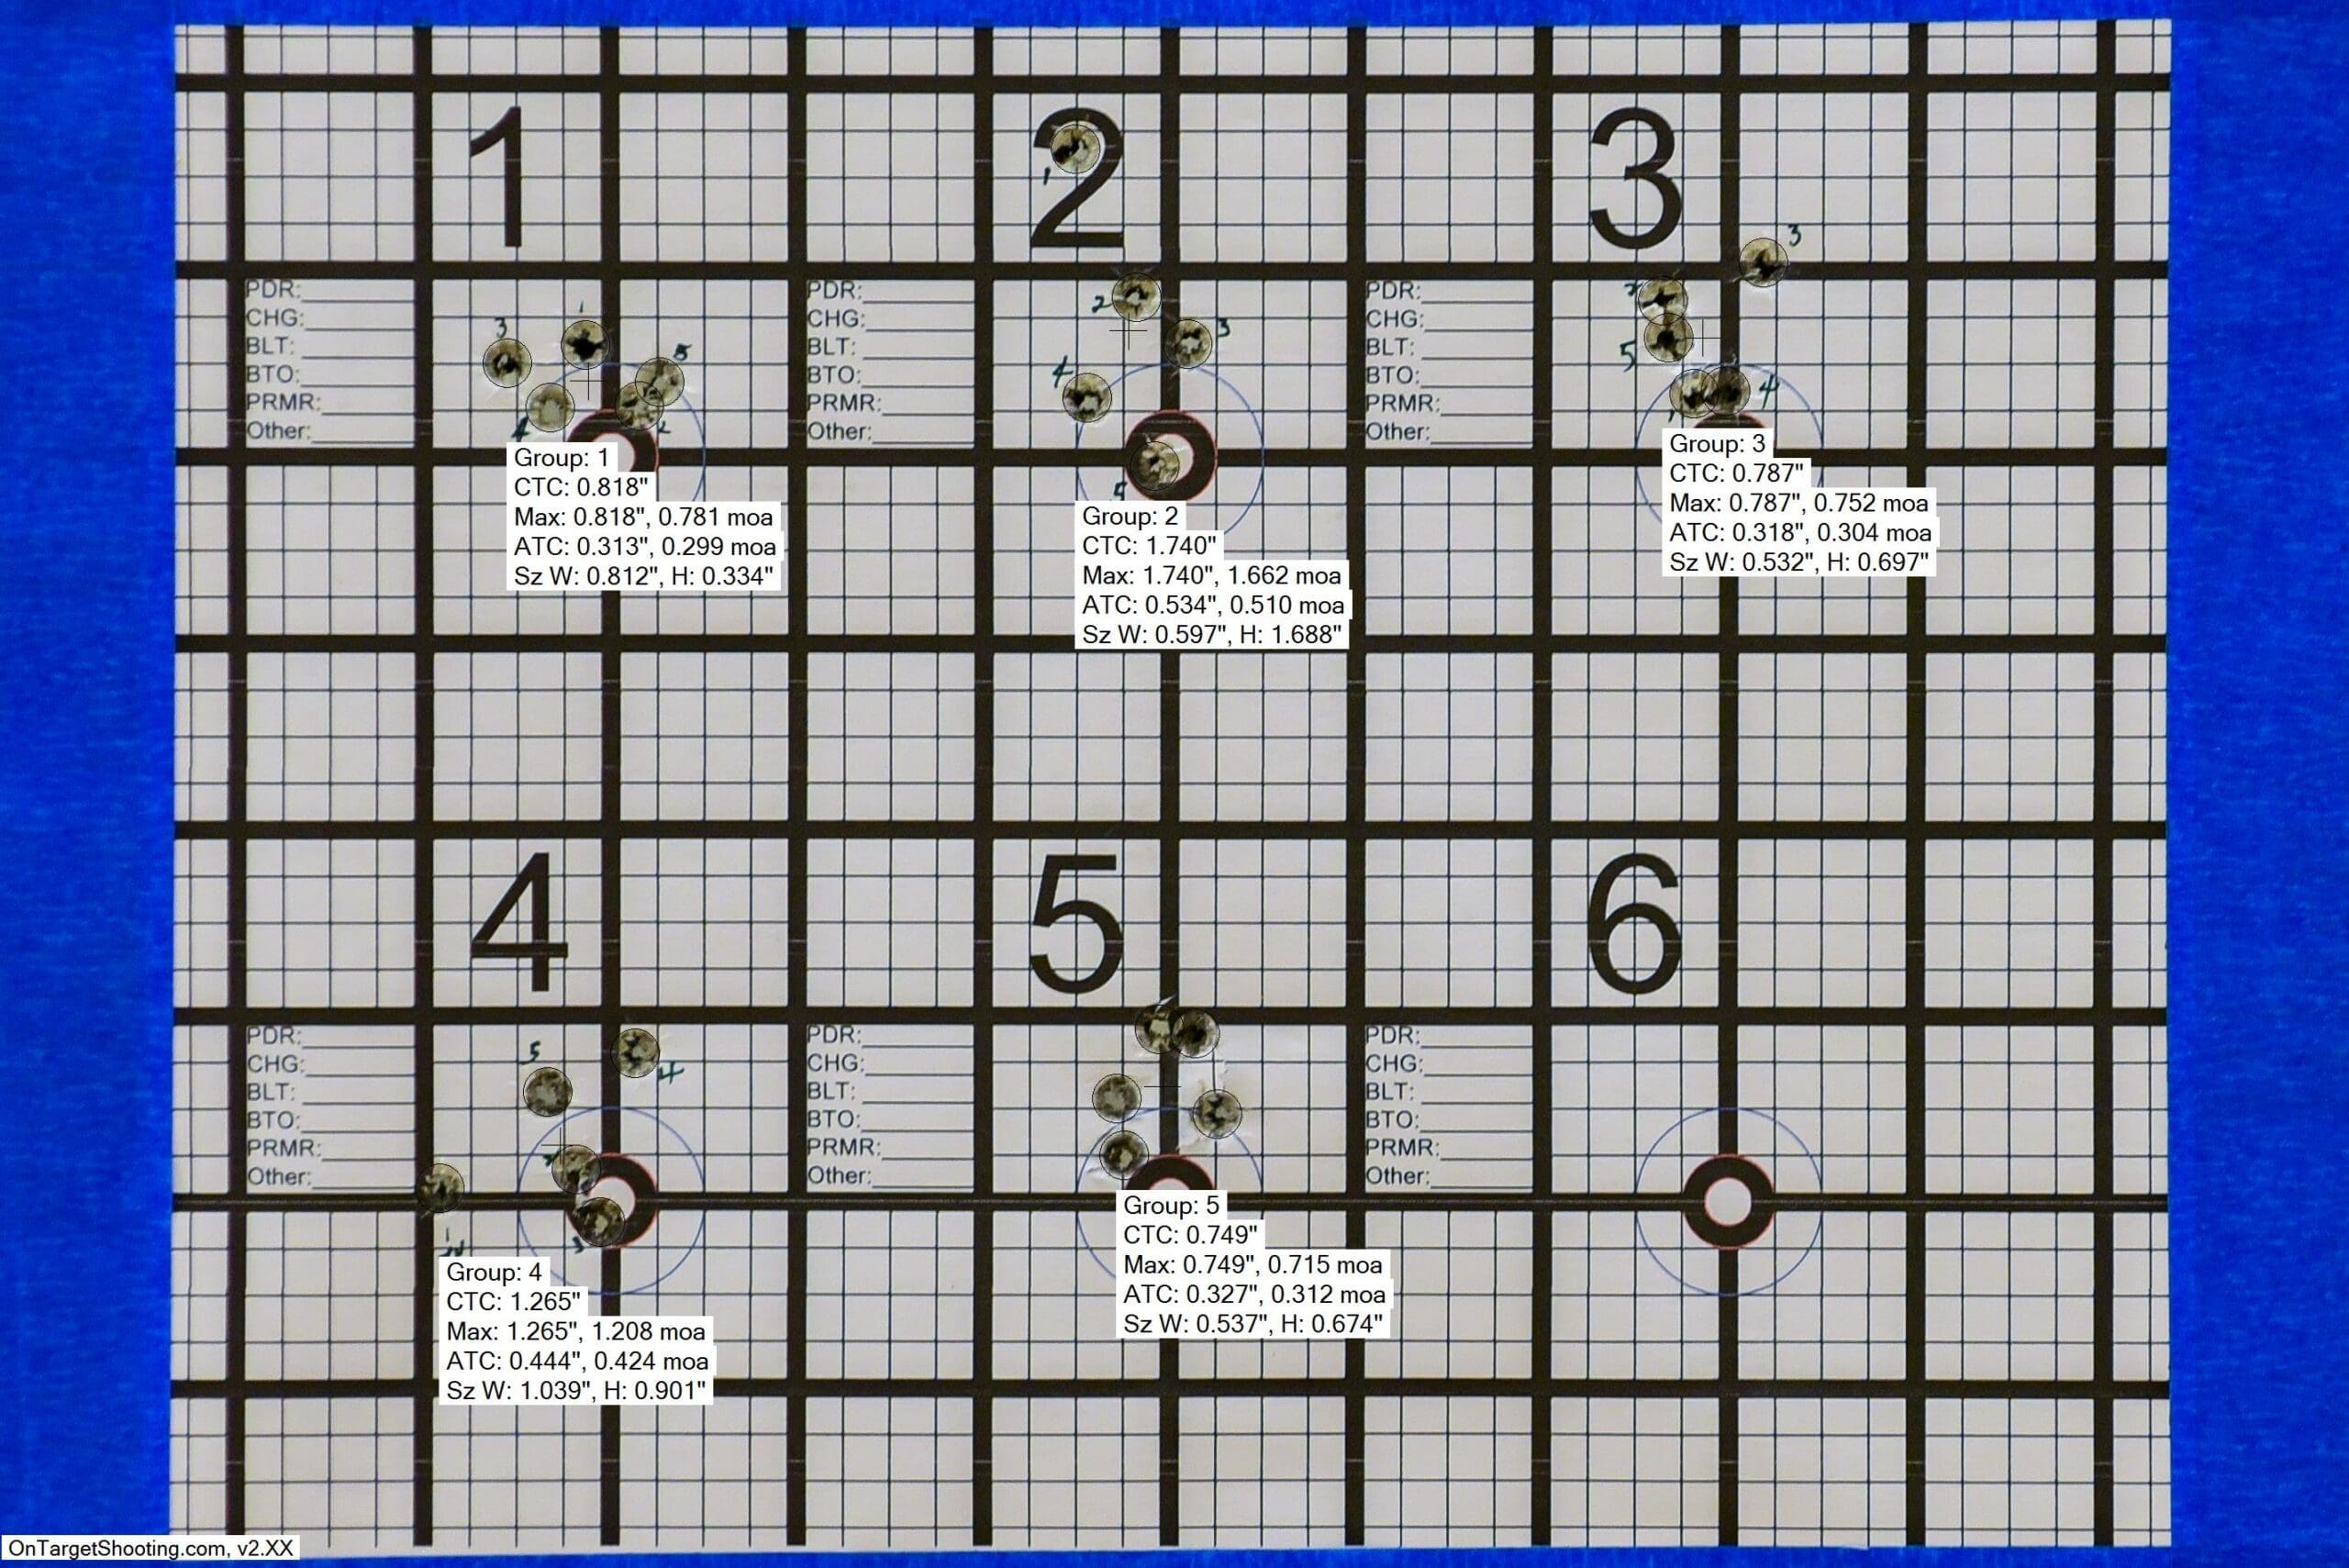
Don’t just load random rounds. Test and tune for best accuracy.
Bomberodevil’s Incremental Method
Popular among long-range hunters.
- Start well below max charge.
- Increase in 0.3–0.5 grain steps.
- Stop 2.0 grains under max.
- Fire 3-shot groups at each increment.
- Find smallest group—your sweet spot.
Example (280 AI, 160-grain bullet):
– 58.8 grains H4831SC → .415 MOA
– 59.1 grains → .440 MOA
– Both under max and highly accurate.
Bluefish’s Velocity Method
- Load 4–5 charges, decreasing from max in 0.1 grain steps.
- Fire 3–5 rounds per charge.
- Measure velocity with chronograph.
- Look for consistent speed without pressure signs.
- Best accuracy often correlates with stable velocity.
💡 Insight: Throat erosion changes optimal seating depth. A .050″ jump may last longer than chasing the lands.
jjwise97’s Practical Approach
- Load 20+ rounds at 0.5 grain under max.
- Use trusted data (e.g., Nosler manual).
- Most rifles shoot within 1.5 MOA from the start—good enough for hunting.
📌 Bottom Line: Hunting accuracy ≠ benchrest perfection. 1 MOA is plenty for ethical shots.
Cartridge-Specific Tips
.30-06 Springfield
- Popular powder: H4350 (temperature-stable)
- Max charge (180-grain): ~57–58 grains
- Good starting point: 55 grains → test upward in 0.3-grain steps
- Works well in Savage, Remington, Winchester actions
280 AI
- High-velocity, long-range favorite
- Recommended powder: H4831SC
- Max load (160-grain): 59.0 grains (Nosler)
- Accurate loads found at 58.8–59.1 grains
- Seat .020″–.030″ off lands for best results
Common Mistakes to Avoid
Even experienced reloaders make errors. Stay safe with these warnings.
Never Assume Ejection Happened
- Always look for the spent case.
- If in doubt, open the bolt again and check.
Skip Bolt Lock Verification
- No click? Don’t fire.
- A partially closed bolt won’t fire and can damage the rifle.
Overcharge Powder
- Always weigh every charge.
- Never rely on volume—powder density varies.
Ignore Case Inspection
- Cracked or bulged brass can fail catastrophically.
- Inspect every case, every time.
Set COAL Incorrectly
- Too long → won’t chamber.
- Too short → increased pressure.
- Use calipers and manual specs.
Final Safety & Best Practices
Store Components Safely
- Keep powder in original containers.
- Store in cool, dry place—away from heat or flames.
- Lock up primers and bullets if children are present.
Maintain Your Equipment
- Clean dies and press after each session.
- Lubricate moving parts as needed.
- Replace worn tools—precision degrades over time.
Document Your Loads
- Keep a notebook or digital log.
- Record:
- Powder type and charge
- Bullet type and weight
- Seating depth
- COAL
- Group size and velocity
This helps replicate success and avoid dangerous repeats.
Final Note: Whether you’re cycling the bolt in the field or handloading at the bench, reloading a hunting rifle is about preparedness, precision, and safety. Master both skills, and you’ll never be caught empty when the moment matters most.


0 Comments