After a successful waterfowl hunt, the next crucial step is knowing how to clean a duck after hunting. Proper field-to-table processing ensures the meat stays fresh, flavorful, and safe to eat. Whether you’ve bagged a mallard, teal, or canvasback, the way you handle your duck directly impacts the quality of your meal. This guide walks you through every stage—from legal transport and aging, to plucking or skinning, organ removal, and long-term storage—so you can maximize yield, avoid common mistakes, and honor your harvest with zero waste.
You’ll learn expert techniques used by seasoned hunters: how to age ducks for easier feather removal, when to pluck versus skin based on species and diet, how to avoid rupturing the gallbladder, and how to use every part of the bird—from cracklings to giblets. By the end, you’ll be equipped with everything needed to turn your duck from field to freezer—and eventually, to a gourmet meal.
Keep Legal Features Attached During Transport
Head or One Wing Must Stay On
Before you begin cleaning, remember: most U.S. states require that a duck’s head or one wing remain attached during transport. This allows wildlife officers to verify species and ensure compliance with bag limits. Never gut or pluck ducks in public areas like parking lots, check stations, or roadside ditches.
- Leave the head or one wing intact until you reach home or private property.
- Store whole birds in a cooler with ice, breast side down to protect the prime meat from bruising.
- Use rotomolded coolers for better insulation and durability, especially when transporting multiple birds.
Warning: Cleaning ducks in public can violate local laws and create negative perceptions among non-hunters. Always process game discreetly and responsibly.
Field Dress Only If Necessary
When to Gut in the Field
Ducks cool quickly due to their small body mass. If temperatures are below 40°F (4°C), you can safely transport ducks whole and un-gutted. However, if it’s warm—above 50°F (10°C)—or you’ll be delayed, field dressing helps prevent spoilage.
How to Field Dress a Duck:
- Make a small incision just above the vent, being careful not to puncture the intestines.
- Gently pull out the intestines, crop, and esophagus, avoiding the liver and gallbladder.
- If available, rinse the cavity with cold water and pat dry.
- Place the bird immediately in a cooler on ice.
Note: Gutted birds spoil faster than intact ones. Only field-dress when necessary.
Age for Better Flavor and Easier Plucking

Refrigerate or Hang Before Processing
Aging improves tenderness and loosens feathers—making plucking significantly easier.
Refrigerator Aging:
- Store un-gutted ducks at 34–40°F (1–4°C) for 1–7 days.
- Some experienced hunters age up to 30 days if the cavity remains sealed and odor-free.
Hanging Method:
- Hang in a cool, dark, bug-proof area (like a garage) for 3–7 days.
- Wrap feet in breathable fabric to deter flies.
Avoid over-aging sea ducks or birds with crustacean-based diets, as their fat can turn rancid.
Pluck or Skin: Choose Based on Species
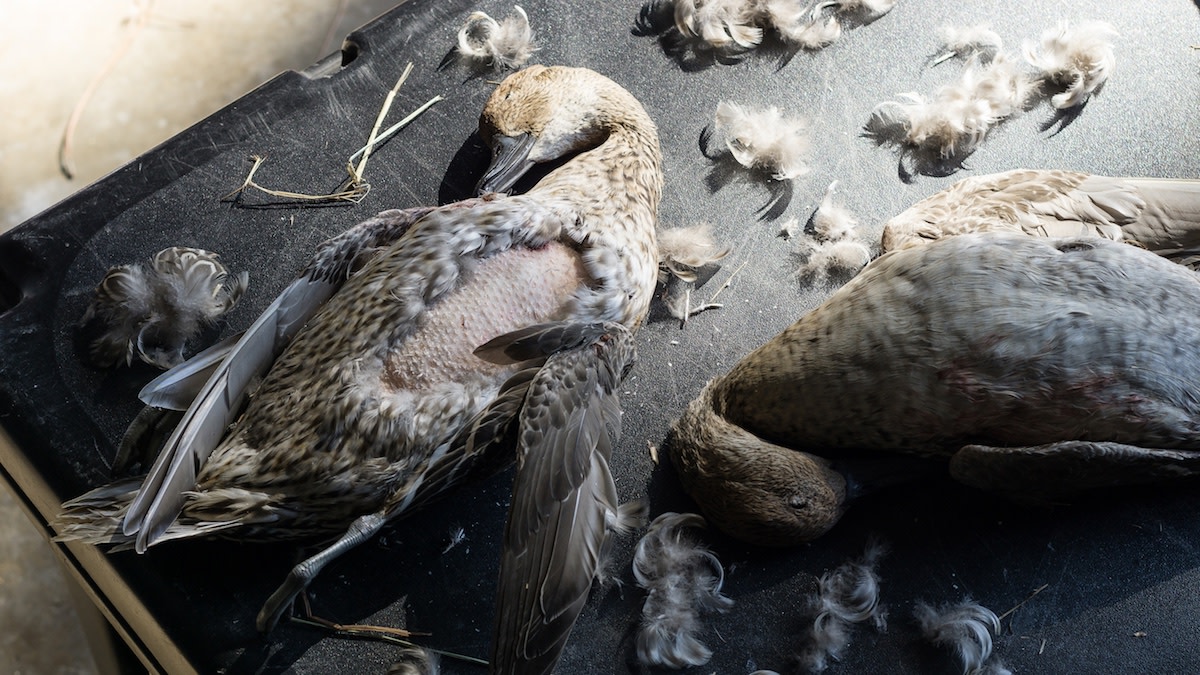
Pluck Puddle Ducks, Skin Divers
The right method depends on species, fat quality, and diet.
| Best for Plucking | Best for Skinning |
|---|---|
| Mallards | Canvasbacks |
| Pintails | Redheads |
| Teal | Shovelers (if orange) |
| Wigeon | Snow geese |
Rule of thumb: If the skin or fat has a fishy odor, skin the bird. Orange skin indicates a crustacean diet—common in shovelers and sea ducks.
Manual Plucking Technique
- Lay duck on its back, feet toward you.
- Begin at the neck, using thumb and forefinger to pinch small groups of feathers.
- Pull against the grain—upward and outward—to remove both flight feathers and down.
- Work down the body, skipping the tough wing ridge feathers for last.
- Finish at the tail, then go back to remove pin feathers by rolling your thumb over the skin.
Never grab large handfuls—this tears delicate skin and ruins presentation.
Wax for a Clean Finish
For smooth results on multiple birds:
- Melt paraffin wax in a pot.
- Dip the plucked duck fully into the wax.
- Immediately submerge in ice water to harden.
- Peel off the wax—it removes all remaining pin feathers.
- Repeat if needed.
Best for batches: Setup takes time, but waxing saves effort on 5+ birds.
Skin Damaged or Frozen Birds
Skinning Preserves Meat Integrity
If the bird is frozen, heavily shot, or has torn skin, skinning avoids further damage.
Steps:
- Use a sharp knife to cut around the neck skin.
- Peel skin back carefully, like removing a jacket.
- Separate skin from meat, keeping good fat unless it smells fishy.
- Remove breasts and legs for immediate freezing.
Pro tip: Skinning allows quick breast removal—ideal for hunters short on time.
Remove Wings, Legs, and Head Properly
Cut Wings at First Joint
- Use kitchen shears or a sharp knife to cut through the first wing joint.
- Save wings for meat, stock, or taxidermy.
- Some hunters cure them with salt or borax for display.
Twist Off Legs for Tenderness
- Cut just through the skin around the hip joint.
- Grab the foot and twist 1–2 full rotations to pop tendons loose.
- Pull hard—the leg will detach cleanly, leaving a more tender thigh.
Alternative: Dislocate by pressing thumb on knee and finger on hip joint.
Remove Head After Plucking
- Take off the head after plucking—it gives you a firm grip during feather removal.
- Cut at mid-neck; save for tongue (edible) or skull display.
- Toss bones and meat scraps into stock.
Gut Without Ruining the Meat
Avoid the Green Gallbladder
Lay the duck breast down, tail toward you.
- Cut through the tail vertebrae just above the vent.
- Insert knife along one side of the spine, slicing from tail to neck.
- Use fingers to pull out windpipe, esophagus, and craw.
- Detach lungs and diaphragm from rib cage.
- Remove intestinal tract in one motion.
- Save heart, liver, gizzard if desired.
Critical: The gallbladder (green sac on liver) must not break. If it leaks, bile will ruin the meat. Rinse immediately and discard contaminated parts.
Process Giblets for Maximum Use
Clean Liver Without Breaking Bile Duct
- Rinse under cold water.
- Locate the bile duct—looks like a green gel cap.
- Pinch it gently and pull away without squeezing.
- Trim carefully. If bile leaks, rinse and discard if tainted.
Wild foie gras: Some mallards develop large, fatty livers—perfect for searing with balsamic or making pâté.
Heart and Gizzard Uses
- Heart: Reach under the breastbone and pull straight up. Trim bruised areas. Great for stir-fries, tartare, or broth.
- Gizzard: Small ones go straight to stock. Large ones (mallards, geese) should be cleaned, trimmed, and slow-cooked (sous vide, corned, or fried).
Remove Breast Meat Efficiently
Separate Fat from Sternum
- Find the keel bone ridge at the base of the breast.
- Push thumb through tissue and slide up the center, under the fat layer.
- Spread meat away from bone.
- Flip and repeat on the other side.
- Use a knife to cut along the sternum and free the breast.
More fat = easier separation. Works best on mallards and gadwalls.
Final Cleaning and Long-Term Storage
Singe Remaining Down
- Use a butane torch to lightly burn off fine hairs.
- Do not char the skin—just flash the fuzz.
Rinse, Dry, and Age in Fridge
- Rinse duck inside and out with cold water.
- Pat dry with paper towels.
- Let sit in the fridge overnight to firm fat and lightly dry-age.
Store for Weeks or Years
- Short-term: Keep in sealed container in fridge up to 7 days.
- Long-term: Vacuum-seal and freeze.
- Water-freeze method: Place whole duck in a quart bag, fill ¾ with water, squeeze out air, freeze flat—prevents freezer burn.
Use Every Part: “Eat Everything But the Quack”
Render Fat for Cooking
- Pope’s nose (tail): High-fat area. Render for duck fat—ideal for frying potatoes or confit.
- 15 ducks ≈ 1.5 cups fat
- One pintail ≈ ½ cup
- Neck skin: Push out bones; use as natural sausage casing.
Make Rich Broth from Scraps
Use:
– Feet
– Neck bones
– Wings
– Giblets
Hack feet with shears to release gelatin. Simmer 4–8 hours for thick, collagen-rich stock—perfect for ramen or gravy.
Species-Specific Tips
Mallard: Pluck and Keep Fat
- Rich flavor, excellent for smoking or confit.
- Always retain fat—it enhances moisture and taste.
Teal: Age First, Then Pluck
- Small birds benefit from aging—feathers loosen.
- Can pluck or skin based on condition.
Shoveler (Spoonie): Skin If Orange
- Orange skin = crustacean diet = fishy taste.
- Skin and discard fat; save meat for sausage or stock.
Diver Ducks: Skin Immediately
- Hard to pluck, often have fishy fat.
- Best used in stews or ground mixtures.
Safety and Efficiency Tips
Work Clean and Sharp
- Use a well-lit, stable surface—preferably outdoors.
- Keep sharp tools ready: knife, shears, sheet metal cutters (for hollow bones).
- Inspect for bone fragments—hollow bones can splinter.
- Never rush plucking—tearing skin wastes meat.
Know What a Cleaned Duck Should Look Like
After processing, you should have:
– Two breast halves (with skin/fat if applicable)
– Two cleaned legs
– Heart, liver, gizzard saved and cleaned
– Wings, head, feet, tail either kept or discarded
– A clean, plucked or skinned, gutted bird ready for cooking or freezing
Final Note: Cleaning a duck properly honors the hunt. By aging, plucking or skinning correctly, saving every usable part, and storing meat right, you ensure top-quality meals and zero waste. Whether you’re a beginner or veteran, mastering how to clean a duck after hunting turns your harvest into something truly rewarding—from field to table.


0 Comments