You don’t need to spend $500 on a store-bought hunting blind to stay hidden from sharp-eyed deer or wary turkeys. With basic tools, a little creativity, and some scrap materials, you can build a fully functional, durable hunting blind for under $200—some designs cost as little as $35. Whether you’re hunting in dense woods, wide-open fields, or transitional edge habitats, a well-built DIY blind gives you the edge by concealing movement, blocking human scent, and improving your shot angles. This guide walks you through proven, budget-friendly builds using pallets, scrap wood, hay bales, and PVC—each designed for quick assembly, long-term use, and maximum concealment.
Start with a Realistic Budget and Purpose
Before you pick up a saw or drill, define your budget and hunting needs. Most affordable blinds fall into three cost tiers:
- Under $50: Pallet or brush builds using free materials
- $50–$150: Scrap wood box blinds or tarp tents
- $150–$200: Elevated or two-person models with better durability
Ask yourself: Will you hunt alone or with a partner? Do you need portability or long-term placement? Are you in a wooded area (favoring elevated stands) or an open field (where ground-level or hay bale blinds work best)? Prioritize concealment, weather resistance, and ease of transport. A $35 pallet blind may last one season, but for just a bit more, a $150 scrap wood build can serve you for years.
Choose the Right Blind Type for Your Situation
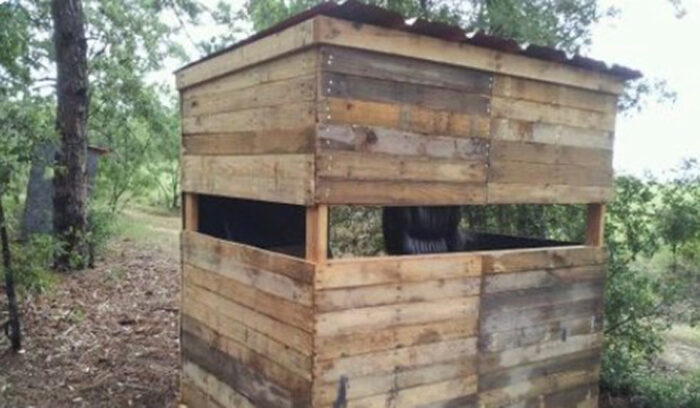
Pallet Wood Blind: $35 Build
Turn free wooden pallets into a rugged, elevated hunting blind. Source damaged or discarded pallets from warehouses, construction sites, or farms.
- Size: 4×6 ft floor, 6 ft walls
- Elevation: 4–7 ft off ground
- Roof: Corrugated plastic or tarp
- Pros: Extremely low cost, modular, eco-friendly
- Cons: Irregular shapes may require extra bracing
Pro Tip: Attach wall pallets to blocking under the floor frame—not directly to the floor—to gain 6–8” of extra interior space.
Scrap Wood Box Blind: Under $150
Perfect for beginners and family hunting, this shed-style blind uses leftover lumber and plywood.
- Frame: 2×6 studs, 16” on-center
- Floor: 6×8 ft outdoor plywood, raised 4 ft
- Windows: 24″x12″ on sides and front
- Door: Back-mounted sliding or hinged
Build it in two halves for easy transport. Paint it in non-reflective colors and wrap with camo netting for instant concealment.
Hay Bale Blind: $100 Total
No tools? No problem. Stack two large round bales 3–4 feet apart and sit between them. Fill the gap with loose hay, brush, or camo fabric.
- Best for: Agricultural fields where bales are common
- Habituation: Deer are already used to bales
Warning: Never leave food, trash, or scented gear inside—especially in bear country.
PVC/Tarp Tent Blind: $75 Portable Option
Ideal for turkey hunting or quick setups near food plots.
- Frame: 1” PVC pipes with connectors
- Cover: Heavy-duty camo tarp and netting
- Setup: Under 10 minutes
- Portability: Folds down small—perfect for backpacking or shared land
This blind is quiet, lightweight, and disappears into most environments when brushed in with local vegetation.
Source Materials for Less Than $150
Where to Find Free or Low-Cost Supplies
| Material | Source | Tip |
|---|---|---|
| Pallets | Warehouses, loading docks | Ask for broken ones—they’re often free |
| Slab wood | Sawmills | Leftover from log milling; great for walls |
| Rubber membrane | Roofing companies | Free scraps; waterproof and silent |
| Cover sheets | Lumber yards | Steel sheets from pole barns—ideal skins |
| Ondura panels | Home Depot | Corrugated asphalt; rubber gasket nails reduce noise |
Avoid pressure-treated wood for interior seating or food storage areas.
Best Budget-Friendly Cladding Options
- Black corrugated plastic: $22/sheet, lightweight, heat-absorbing, quiet
- Used plywood: Check Habitat for Humanity ReStores; seal with a 50/50 oil-diesel mix
- Charred wood (shugi ban): Torch surface to preserve and camouflage
- Camo netting: Wrap entire blind—breaks up outline instantly
Never use shiny or reflective materials—they catch sunlight and alert game from 100+ yards.
Build a Simple 4×6 ft Scrap Wood Box Blind (Under $150)
Gather Materials
- 2×6 pressure-treated lumber (frame) – $25
- Outdoor plywood (6×8 sheet) – $10 (half for floor, half for walls)
- Galvanized nails (3.5”) – $5
- Reused hinges and sliding track – $10
- Scrap wood for windows and door – $0
Total cost: ~$150—well under $200 if you repurpose hardware.
Frame the Floor and Raise It Off the Ground
- Cut (2) 6-foot 2x6s and (4) 37-inch 2x6s for the base.
- Assemble into a rectangle; nail securely.
- Add joists every 16” for support.
- Attach plywood floor; drill ¼” drainage holes in each corner.
- Raise the entire floor 4 feet using 4×4 posts.
This height clears underbrush and improves visibility over tall grass.
Construct Walls and Roof
- Nail upright 2×4 studs to the frame.
- Sheathe with plywood; cut window openings:
- Two side windows: 24″x12″
- Front window: 30″x12″
- Bottom edge at 27–36” for seated shooting
- Install a slightly pitched roof (front higher than back) to shed rain.
- Use two plywood sheets, overlapped and sealed with caulk.
Visual Cue: Roof should slope toward the back so rain runs away from the door.
Install Door and Operable Windows
- Door: Mount on the back wall using a sliding track—saves interior space.
- No center support—prevents tripping in low light.
- Windows: Add hinged flaps with string pulls:
- Tie string to bottom of flap
- Run through hole in top of wall
- Pull to open, tie off inside
Seal edges with duct tape or rubber gasket to prevent leaks and noise.
Paint and Conceal the Exterior
- Use non-reflective paint: olive drab, black, or tan
- Or wrap entire blind in camo netting secured with zip ties
- Brush in with local vegetation—break up the outline
Key Rule: Let the blind sit 5–7 days before hunting so deer get used to it.
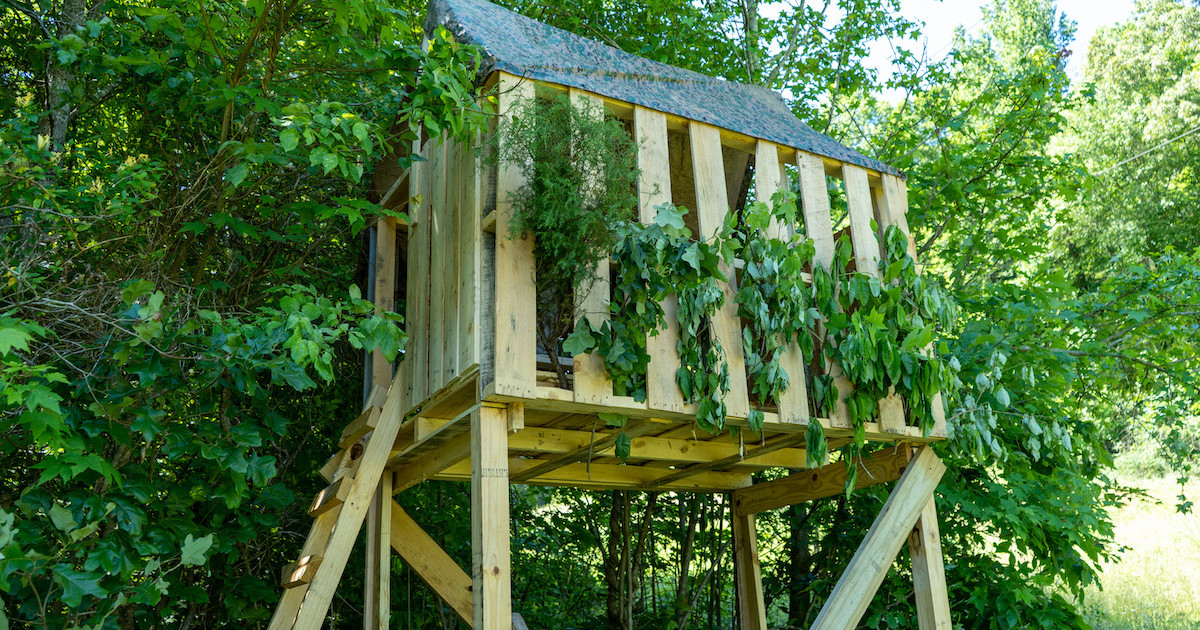
Upgrade to an Elevated DJ-Style Blind (Under $550)
Why Go Elevated?
An elevated blind offers:
– Better sightlines through brush
– Reduced ground noise and scent transfer
– Harder for animals to detect
This two-person portable blind costs $475–$550 but lasts for years.
Build the Frame and Attach Legs
- Floor frame: 60” x 48” with 3 interior 2×4 joists
- Wall posts: Front 78.5”, rear 66.5” for 15° roof pitch
- Legs: (4) 10’ pressure-treated 4x4s
- Attach legs with three ½” x 10” carriage bolts per leg
Safety First: Always use guy lines with 15” ground anchors in wind over 30 mph.
Skin with Quiet, Lightweight Panels
- Use black corrugated plastic sheets ($210 for 10-pack)
- Lightweight, quiet, and warms up in sun
- Secure with roofing screws + rubber washers
- Seal seams with duct tape
Avoid metal roofing—it’s loud when it rains.
Add String-Operated Windows and Rear Exit
- Cut flaps in front and sides
- Use string system to open from inside:
- String tied to flap bottom
- Thread through hole in wall top
- Pull and tie off on interior screw
- Keep closed with corner strings or magnetic strips
Pro Tip: Add a rear door flap with the same system for quick exit or escape.
Transport and Set Up Efficiently
- Fits in a short-bed truck (tailgate down)
- Safer: Remove legs, store between bed rails
- Can be lifted into place from truck bed by two people
- Or assemble on ground and drag into position
Add a wheel kit to frame if moving it frequently.
Use Natural and Temporary Options
Build a Free Brush Blind
No tools? No problem.
1. Find a fallen tree or brush pile.
2. Stack branches vertically around it.
3. Weave in leaves, vines, and grass.
4. Keep gaps small—break up your silhouette.
- Best for: Spot-and-stalk hunters or short sits
- Rebuild as needed—lasts 1–2 weeks
Time Saver: Use a tarp as backing, then pile brush in front.
Stack Hay Bales for Instant Cover
- Place two round bales 3–4 ft apart.
- Sit between them; fill gap with hay or camouflage fabric.
- Works best in agricultural areas where bales are common.
Deer won’t spook—they see bales all the time.
Design for Durability and Stealth
Weatherproof the Blind
- Elevate floor at least 4 inches off soil
- Use pressure-treated lumber for ground contact
- Drill drainage holes in floor corners
- Pitch roof at least 6–8” for runoff
- Add metal flashing at roof edges to direct water
Reduce Noise and Echo
- Line interior with carpet tiles or ½” fiberboard
- Stops sound bouncing and hides boot noise
- Use Ondura or plastic roofing instead of metal
- Avoid slamming doors—use soft-close hinges
Camouflage Like a Pro
- Match local colors: browns in forests, tans in fields
- Add 3D camouflage with jute, burlap, or fake vines
- Never leave the blind too “clean”—dirt and moss help it blend
- Re-vegetate annually with local plants
Place It for Maximum Success
Best Locations
- Downwind of game trails
- Near food plots or water sources
- Edge habitats (woods to field transitions)
- Elevated in trees with natural cover
Avoid placing near property lines or public roads.
Let It Habituate
- Set up 5–7 days before hunting
- Visit only during daylight to avoid spooking deer
- Don’t leave human scent—wear gloves, avoid eating inside
Fact: Deer notice new objects within hours. Give them time to accept it.
Maintain and Extend Lifespan
Annual Checkup
- Inspect for rot, loose screws, pest damage
- Re-seal seams and window edges with caulk
- Reapply oil/diesel mix (50/50) every 1–2 years for insect resistance
- Check for porcupine chewing—use metal corners in high-risk zones
Store or Seal When Not in Use
- Close all flaps and doors
- Tape shut vents to keep out wasps
- In bear country: Remove all scented items or disassemble
Stay Safe and Legal
- Check local laws: Some states ban permanent blinds or elevated stands
- Always wear a harness when hunting elevated
- Use guy lines on tall blinds—never rely on wood alone
- Label your blind with name and phone number
- Avoid building near roads or trails
Critical: Never shoot from an unsecured stand. Use three-point contact when climbing.
Final Tips for Success
- Start small: Build a $50 pallet blind first to test design
- Use what you have: Scrap wood, old tarps, and free pallets work fine
- Keep it quiet: Test door hinges and window flaps before season
- Think portable: Build in sections for easy transport
- Customize it: Add shelves, gun rests, or seat brackets
You don’t need power tools or a big budget. With a saw, drill, screws, and a weekend, you can build a hunting blind that outperforms store-bought models.
“The best blind isn’t the fanciest—it’s the one that keeps you hidden, dry, and ready when the buck steps into range.”
Build smart. Hunt often. Stay hidden.


0 Comments