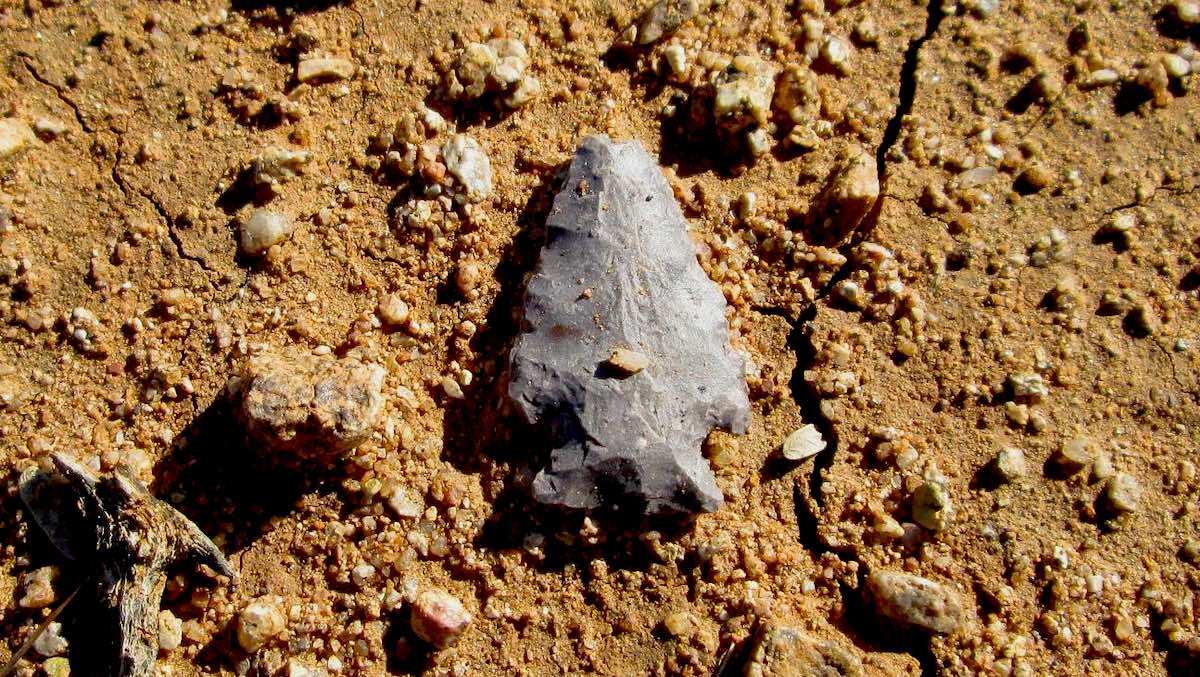
There’s a quiet thrill in spotting a flint triangle half-buried in red clay—your fingers brushing dirt away to reveal an arrowhead crafted thousands of years ago. This isn’t just a rock; it’s a tool shaped by a Native American hunter who once tracked game across the very same land. Arrowhead hunting blends outdoor adventure with archaeology, offering a tangible connection to North America’s deep past. But real success doesn’t come from luck—it comes from knowing where to look, when to go, and how to search with respect.
With the right arrowhead hunting tips, you can uncover authentic artifacts while staying within the law and honoring Indigenous heritage. This guide delivers field-tested strategies for finding arrowheads on private land, identifying genuine pieces, and preserving their historical value. You’ll learn how to read the landscape like an ancient traveler, spot subtle signs of tool-making, and turn flint flakes into major discoveries. Whether you’re new to surface collecting or refining your skills, these proven arrowhead hunting tips will help you find more—and do it the right way.
Know the Law: Where You Can’t Hunt
Federal & State Land Rules
Collecting arrowheads on public land is illegal and can lead to serious penalties. The Archaeological Resources Protection Act (ARPA) prohibits digging, removing, or disturbing artifacts on federal property, including:
– National parks and monuments
– State forests and wildlife management areas
– Bureau of Land Management (BLM) zones
– Corps of Engineers reservoirs
In states like Pennsylvania, violating these laws can result in fines, confiscation of equipment, and even criminal charges. These sites are protected because they hold irreplaceable cultural data—once disturbed, their historical context is lost forever.
Private Land = Legal Access
You can legally hunt arrowheads on private property—but only with the landowner’s permission. Always get verbal or written consent before stepping onto private land. Many farmers welcome responsible collectors, especially after spring plowing or construction, when artifacts are brought to the surface.
Avoid These Restricted Zones
Never dig or probe in:
– Mounds, burial grounds, or ceremonial earthworks
– Areas with human remains or grave markers
– Sites with historical plaques or protected status
If you discover potential human remains or a sacred site, stop immediately, do not touch anything, and contact your state historic preservation office (SHPO) or local archaeologist.
Think Like a Native American: Where They Lived

Camp Near Water, Just Above Flood Level
Water was life. Native Americans settled near fresh, reliable sources—but not in flood-prone areas. Focus your search on:
– High ground adjacent to rivers or creeks
– Flat benches above seasonal water levels
– Bluffs with clear views of water and game trails
Spring-fed streams were preferred over seasonal ones, making them prime zones for ancient camps.
Follow Game Trails and Natural Funnels
Hunters camped along natural animal corridors—narrow passes where deer, elk, or bison moved to drink. These “funnel zones” increased hunting success and are rich in tool-making debris. Look for ridges, saddle points, or gaps between hills that channel wildlife.
Use Topographic Maps to Predict Campsites
Study USGS topo maps or Google Earth to find:
– Ancient river terraces
– Dry creek beds
– Confluence points of two streams
– Elevation changes near water
These features reveal where people likely camped thousands of years ago.
Best Places to Find Arrowheads
Plowed Fields After Tilling
Spring and fall plowing bring buried artifacts to the surface. Walk freshly tilled fields slowly, scanning for chert, flint, or debitage. Focus on:
– Corn and soybean fields
– Food plots for deer
– Recently disked or harrowed land
Soil turnover exposes layers that haven’t seen daylight in centuries—your best shot at old points.
Creek Gravel Bars at Inside Bends
Water deposits artifacts on inside bends of creeks where flow slows. Search gravel bars opposite eroded cut banks. After rain, artifacts wash loose and become visible. Larger points may be near headwaters; smaller flakes settle downstream.
Disturbed Ground Features
Look where soil has been moved:
– Construction sites
– Road cuts
– Drainage ditches
– Power-line clearings
– Logging trails
These mimic natural erosion and often reveal hidden artifacts.
Elevated Flat Areas Near Water
Flat-topped knolls just above flood level were ideal for camps. They offered:
– Safety from rising water
– Easy access to fishing and hunting
– Good visibility for defense
Walk these benches carefully—many arrowheads lie just beneath leaf litter.
When to Hunt: Timing Is Everything
Spring Offers Prime Conditions
Spring is the best season because:
– Rain washes away topsoil
– Fields are freshly plowed
– Ground is soft and exposed
Search within 24–48 hours after heavy rain—wet soil darkens, making light-colored flint stand out clearly.
Fall After Harvest Works Too
Post-harvest tilling in October and November exposes new layers. Dry conditions make walking easier than in muddy spring fields.
Ideal Weather for Spotting
- Overcast skies reduce glare and improve contrast
- Early morning light casts shadows that highlight small objects
- Wet ground enhances visibility of flint and chert
Avoid midday sun in summer—it washes out details and increases heat risk.
Spot Real Arrowheads: Identify Authentic Artifacts
Look for Flint Knapping Marks
Real arrowheads show signs of human craftsmanship:
– Flake scars – concave, smooth depressions from chipping
– Bulb of percussion – a rounded bump at the base of a flake
– Ripple marks – concentric waves from impact
– Platform edge – flat striking surface
Rocks with random fractures lack these features.
Know Common Stone Types
Arrowheads were made from workable stone:
– Chert – most common; ranges from white to black
– Flint – dark, glassy, fine-grained
– Obsidian – volcanic glass, sharp and shiny
– Jasper – red or yellow, often banded
– Quartz – translucent or milky
– Petrified wood – fossilized tree material
Softer stones like limestone were rarely used.
Don’t Ignore Debitage
Flint flakes (debitage) are more common than finished points. Finding flakes means someone made tools there. Follow them upstream—they often lead to workshops or campsites.
Creek Hunting Strategies That Work
Target Confluence Zones
Where two waterways meet, debris and artifacts collect. These zones were also social hubs. Search both banks carefully.
Hunt After Rain, Not During
Wait until water levels drop. Search the day after heavy rain when:
– New gravel bars are exposed
– Sediment has settled
– Artifacts are washed clean
Never enter fast-moving water—safety comes first.
Use Water to Reveal Hidden Points
Bring a shallow bowl or cup. Splash water on dry gravel—it darkens the surface and makes flint glint in sunlight. A small flashlight can highlight edges on wet stone.
Wear Knee-High Boots
Protect yourself from:
– Slippery rocks
– Snapping turtles
– Water snakes
– Hidden nails or glass
Knee-high rubber boots give stability and keep you dry.
Field Techniques for Serious Hunters
Walk a Grid Pattern
Use a systematic grid:
– Walk straight rows across a field
– Slightly overlap each pass
– Mark start/end points with sticks or GPS
This ensures full coverage and increases find rates.
Carry Essential Tools
Pack a small kit:
– Walking stick – flip rocks without bending
– Old toothbrush – clean dirt gently
– Small trowel – light surface scraping (no deep digging)
– Sieve or screen – sift disturbed soil
– GPS or phone app – record exact find locations
Train Your Eye on Debitage
Most hunters look for arrowheads—but flakes are the real clue. Once you find debitage, expand your search in circles. High concentrations suggest a workshop or campsite.
Document and Preserve Your Finds
Record Every Detail
For each artifact, note:
– GPS coordinates
– Date and time
– Soil type and nearby features
– Photos from multiple angles
– Sketch of the site layout
Context matters—location tells archaeologists about settlement patterns.
Store Safely
Never toss arrowheads in your pocket—tips break easily. Instead:
– Wrap in cloth or paper towel
– Store in padded containers (Altoids tins, foam-lined boxes)
– Label with site name and date
Keep similar finds together for research.
Ethical Hunting: Honor Native Heritage
Leave Burial Sites Alone
If you find human bones or grave goods:
– Stop digging
– Do not touch or remove anything
– Contact local authorities or SHPO
These sites are sacred and legally protected.
Don’t Sell Artifacts
Selling arrowheads fuels looting and destroys context. Most ethical collectors:
– Keep finds for personal study
– Donate duplicates to museums
– Share knowledge with historians
Treat artifacts as cultural heritage, not commodities.
Report Major Discoveries
Found a mound, village site, or large cache? Notify:
– State archaeologist
– Local university anthropology department
– Tribal historic preservation office
Your find could contribute to real research.
Expert Tips for Better Results
Talk to Landowners and Farmers
Locals often know where artifacts have been found. Ask:
– “Have you ever seen arrowheads here?”
– “When was this field last plowed?”
– “Were any tools or pottery found during construction?”
Farmers may even invite you back after tilling.
Hunt Layers of History
Old Indian camps are often buried under later settlements. Look for:
– Glass bottles
– Nails
– Horse collars
– Ceramic shards
These homesteader relics sit above ancient layers—disturbance can expose older points.
Carry a Reference Arrowhead
Some hunters carry a real arrowhead in their pocket to “train the eye.” While not scientific, many say it improves pattern recognition and focus.
Test the Past: Stone Points Still Work
Primitive archer Billy Berger tested flint points on a deer carcass—penetration matched steel broadheads. Ancient hunters used effective weapons. Handle finds with respect—they were once lethal tools.
Final Arrowhead Hunting Tips
Here’s your quick checklist for success:
✅ Get landowner permission – never hunt without it
✅ Start near water – rivers, creeks, springs
✅ Search plowed fields after rain – best visibility
✅ Look for flakes first – they lead to points
✅ Use GPS to mark finds – track hotspots
✅ Walk slow, scan low – eyes 6 inches off the ground
✅ Avoid public land – it’s illegal and unethical
✅ Preserve context – location is part of the story
✅ Respect Native culture – don’t dig graves or sell finds
✅ Stay patient – every flake brings you closer
Arrowhead hunting isn’t treasure hunting—it’s time travel. Every piece you find connects you to people who lived here long before roads or cities. With these arrowhead hunting tips, you’ll search smarter, find more, and honor the past.
Stay legal. Stay safe. Stay curious.
Happy hunting.


0 Comments