Hunting pressure isn’t just a visual cue on your map—it’s a core mechanic in Call of the Wild: The Hunter (COTW) that reshapes wildlife behavior, erases feeding zones, and can turn your prime trophy spot into a ghost town overnight. Unlike other hunting games where animals respawn predictably, COTW simulates a living ecosystem that reacts to your actions. Every time you take a shot and hit an animal, you leave behind a 100-meter pressure zone centered on the first point of impact. Ignore it, and that zone will grow darker, scarier for wildlife, and eventually wipe out all nearby need zones—feeding, resting, watering—permanently. The worst part? Time doesn’t heal this wound. You can wait days in-game, and the pressure won’t fade. But here’s the good news: you can remove it—by hunting elsewhere. This guide reveals exactly how hunting pressure works, how to erase it efficiently, and how to build a sustainable rotation that keeps your map alive and trophy animals spawning.
Locate and Identify Pressure Zones on Your Map
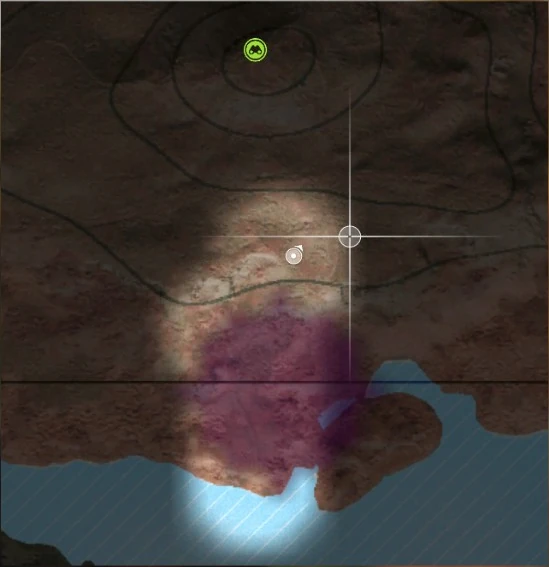
Before you can fix a problem, you have to see it. In COTW, pressure shows up as circular overlays on your map, color-coded by intensity. These aren’t just cosmetic—they’re warnings of ecological damage.
How Pressure Appears Visually
- Pinkish-red circle: One kill in the area. Low stress, but animals may start to act cautiously.
- Dark purple: Two kills. Nervous behavior increases; fewer animals enter.
- Bright purple: Three or more kills. High alert. Trophy animals vanish. Need zones are at risk.
The center of each circle is where your bullet or arrow first struck an animal—not where it died or was field-dressed. Even if the animal ran 600 meters before collapsing, the pressure stays fixed at the impact point.
🔍 Pro Tip: Use the map’s color gradient to prioritize cleanup. Bright purple zones are on the verge of collapse—act fast before need zones disappear forever.
Understand the Deletion Thresholds for Need Zones
The real danger of hunting pressure isn’t just fewer animals—it’s permanent ecosystem damage. When pressure builds too high, all need zones within the 100m radius are erased and respawn randomly elsewhere. That prized elk wallow? Gone. The red deer bedding spot? Relocated. And there’s no warning.
How Many Kills Trigger Zone Deletion?
It depends entirely on how you hunt:
– On foot (rifle/handgun): After 3 kills, the 4th wipes all need zones.
– From a tripod, tree stand, or blind: Up to 14–15 kills allowed before deletion.
– Bow or crossbow: Same as using a structure—up to 15 kills.
– Bow + structure combo: Up to 19–21 kills observed before deletion.
This means hunting from elevation or with quiet weapons doesn’t just reduce noise—it fundamentally delays ecological collapse.
⚠️ Critical Mistake: Making a 4th on-foot kill in any zone is irreversible. The game deletes need zones instantly. No second chances.
Clear Old Pressure with Strategic New Kills

You cannot wait out hunting pressure. The only way to remove it is through active redistribution: making new kills in fresh zones to trigger the decay of the oldest pressure event.
Pressure Follows First In, First Out (FIFO)
COTW uses a FIFO system:
– The oldest pressure zone fades when new kills occur.
– Each new kill reduces the oldest pressure by ~0.1 units.
– Location doesn’t matter—killing in a new valley can erase pressure from your very first kill.
For example: if your first-ever kill created a high-pressure zone near Layton Lake, go hunt deer in a different region. After 10 new on-foot kills, that original zone will vanish—even if it’s on the other side of the map.
Kill Ratios to Remove Pressure
Different methods clear pressure at different rates:
| Your New Kill Type | Kills Needed to Clear | Pressure Type Removed |
|---|---|---|
| On foot (firearm) | 10 | On-foot pressure |
| From tripod | 3 | Tripod pressure |
| Bow/crossbow | 3 | Bow pressure |
| From tripod | 9 | On-foot pressure |
| Bow | 9 (estimated) | On-foot pressure |
🎯 Key Insight: A single tripod or bow kill is 3.3x more efficient at clearing its own pressure type than an on-foot kill. Use this to target cleanup strategically.
Hunt with Bows and Stands to Minimize Pressure Buildup
The best way to manage pressure isn’t just removal—it’s prevention. Bows and hunting structures don’t just help you stay hidden—they drastically reduce how much pressure each kill adds.
Bows Add Minimal Pressure Per Kill
- Firearm on foot: +1.0 pressure per kill
- Bow or crossbow: +0.25 pressure per kill
- Bow from stand: Estimated +0.06–0.1 pressure
This means you can make four times more kills with a bow before hitting the deletion threshold. Combine that with faster decay when clearing old zones, and bows become essential for long-term trophy farming.
🏹 Pro Tip: For diamond animals or Great One grinds, always use a bow from a tree stand. You’ll extend zone life and clear old pressure faster.
Hunting Structures Extend Zone Lifespan
Even if you use a rifle from a tripod or tree stand, you’re still capped at ~0.25 pressure per kill, allowing up to 15 kills before deletion. That’s five times more than on-foot hunting.
This makes structures ideal for:
– Holding key waterhole or ridge-line positions
– Farming trophy animals over weeks (game time)
– Rotating between core zones without collapse
Rotate Between 3–5 Hunting Zones for Sustainability
Overhunting one area is the fastest way to kill your map’s vitality. Sustainable players use zone rotation—spreading kills across the map to balance pressure and allow recovery.
Build Your Core Hunting Network
Pick 3–5 geographically distinct zones, each at least 300–500 meters apart to prevent overlapping pressure circles. Ideal spots include:
– High ridges with long sightlines
– Water sources (lakes, rivers, wallows)
– Forest edges near open fields
– Known trophy spawn points
Label them mentally or in a journal. Track how many kills you’ve made in each.
Follow the Rotation Cycle
- Hunt Zone A until 2–3 kills.
- Switch to Zone B.
- After 3–4 kills in B, move to C.
- Return to A only after 10+ new kills elsewhere.
This natural rotation keeps all zones active and prevents any single area from hitting the deletion threshold.
⚠️ Avoid: Stacking 4+ kills on foot in one zone. That fourth kill is the point of no return.
Revive a Dead Zone: Step-by-Step Recovery
When a zone turns bright purple and animals stop showing up, don’t abandon it. You can bring it back.
Step 1: Identify the Oldest Pressure Zone
Open your map and find bright purple circles. If you remember your earliest kills, focus on those—they’ll be the first to fade.
Step 2: Stop Hunting There
Any new kill adds pressure. Worse, if you’re near the threshold, you risk wiping need zones permanently.
Step 3: Make Fresh Kills Elsewhere
Move to a low-pressure zone at least 200m away. Start making kills:
– Use a bow or stand for faster decay.
– Aim for 3–10 clean kills, depending on method.
Each kill chips away at the oldest pressure event in your history.
Step 4: Monitor Map for Fading Circles
After several new kills, check your map. The oldest pressure circle should shrink or disappear. This confirms the FIFO system is working.
Step 5: Return and Resume Hunting
Once the pressure is gone, go back. Animals will return. Trophy-class animals may respawn within hours (game time) if need zones survived.
✅ Success Story: One player revived a deleted albino doe spawn site after 6 distributed kills across five lakes. The zone reactivated, and the animal returned within a day.
Use Pressure Zones to Improve Tracking
While pressure harms animal movement, it has one major benefit: tracking wounded animals.
Since the pressure circle marks the first shot impact, always return there to begin your blood trail. Even if the animal ran far, the trail starts at ground zero.
Follow these steps:
1. Mark the pressure zone on your map.
2. Approach slowly, watching for blood drops, disturbed grass, or hoof prints.
3. Use the South Feet perk for weight estimation.
4. Use Spotting Knowledge to see health bars if the animal is still alive.
🧩 Expert Note: If you lose the trail, re-center at the pressure point. Most wounded animals are found within 100m of the first shot.
Debunk Common Pressure Myths
Misinformation spreads fast. Here’s what doesn’t work—and what does.
Myth: “Pressure Fades Over Time”
❌ False. A pressure zone from your first kill will remain until you make 10+ new kills elsewhere.
Myth: “Killing in the Same Spot Clears Pressure”
❌ False. It adds to the stack. A 4th on-foot kill deletes need zones.
Myth: “Waterfowl Are Immune to Pressure”
✅ Partially true. Waterfowl ignore pressure zones when flying, but killing them still creates pressure that can delete nearby deer or elk zones.
🛠️ Strategy: Don’t overhunt ducks near prime trophy zones. A few kills are safe, but repeated hunting destabilizes the ecosystem.
Final Strategy: The Sustainable Hunting Loop
To dominate COTW long-term:
1. Start with a bow or from a stand.
2. Pick 3–5 zones across the map.
3. Make 2–3 kills per zone, then rotate.
4. After 10 total kills, older pressure begins to fade.
5. Return to cleared zones for trophy respawns.
6. Log kills to avoid overhunting.
Repeat. This method preserves need zones, maximizes trophy spawns, and keeps the world alive.
🎯 Final Tip: Hunting pressure isn’t a bug—it’s the game rewarding smart, adaptive hunters. Master it, and you don’t just survive the wild—you control it.


0 Comments