If you’ve ever lost a shot because your hunting blind window fogged up, froze shut, or blocked your aim, you know how critical this small detail really is. A poorly built window can ruin an otherwise perfect setup—even with ideal cover and positioning. The good news? Making hunting blind windows that are durable, weather-resistant, and silent is simpler than most hunters think. Using affordable, off-the-shelf materials like polycarbonate, cedar, and basic hardware, you can build custom windows that outperform many commercial models.
This guide walks you through every step—from selecting the right transparent panel and framing it properly to sealing against rain and eliminating glare. You’ll learn how to avoid common failures like frozen sliders or noisy hinges, choose the correct thickness for your climate, and customize your design for bow versus rifle hunting. Whether you’re building a permanent ground blind or a portable pop-up, these battle-tested techniques come from real hunters who’ve used their setups in snowstorms, high winds, and sub-zero temperatures. Let’s dive in.
Choose the Right Transparent Material for Durability and Clarity

The performance of your hunting blind window starts with the panel material. Not all clear plastics are created equal—especially when exposed to UV rays, freezing temps, or accidental impacts.
Use Polycarbonate (Lexan) for Maximum Strength
Polycarbonate, commonly sold as Lexan, is the gold standard for serious DIY builds. It’s up to 250 times more impact-resistant than glass and won’t shatter under stress. In freezing conditions, it remains flexible and crack-resistant, making it ideal for northern climates. For most applications, 1/8″ or 3/16″ thickness works well. Go with 1/4″ for large openings or areas prone to high winds.
✅ Pro Tip: Opt for tinted or non-glare Lexan to reduce reflections that can spook game. Some hunters apply camo window film (~$50) for extra concealment.
Always clean with a microfiber cloth only—never paper towels or abrasive cleaners—to prevent scratches that degrade visibility over time.
Try Plexiglass for Budget-Friendly Builds
Acrylic (plexiglass) offers excellent optical clarity at a lower price point than polycarbonate. It’s a solid choice for temporary blinds or first-time builders on a tight budget. However, plexiglass becomes brittle after 10–15 years of UV exposure. One hunter replaced his after 17 years when it cracked during routine cleaning.
Stick with 1/8″ or 0.22″ thickness for balance between rigidity and weight. Keep the protective film on until final installation to prevent scratches during construction.
Avoid Flexible Vinyl Unless Building a Temporary Blind
Marine-grade clear vinyl is cheap and easy to install but prone to tearing in wind and sagging over time. Best used in short-term or mobile blinds where cost matters more than performance.
⚠️ Warning: Never use greenhouse plastic or shower curtains—they fog instantly and offer zero structural support.
Consider Tempered Glass for Permanent Setups
For fixed-position blinds on platforms or cabins, 1/4″ or 1/2″ tempered glass delivers unmatched clarity and scratch resistance. While heavy and harder to transport, it lasts indefinitely if properly mounted. Always secure it in a reinforced frame and handle with care during installation.
Build a Weatherproof Frame from Rot-Resistant Wood
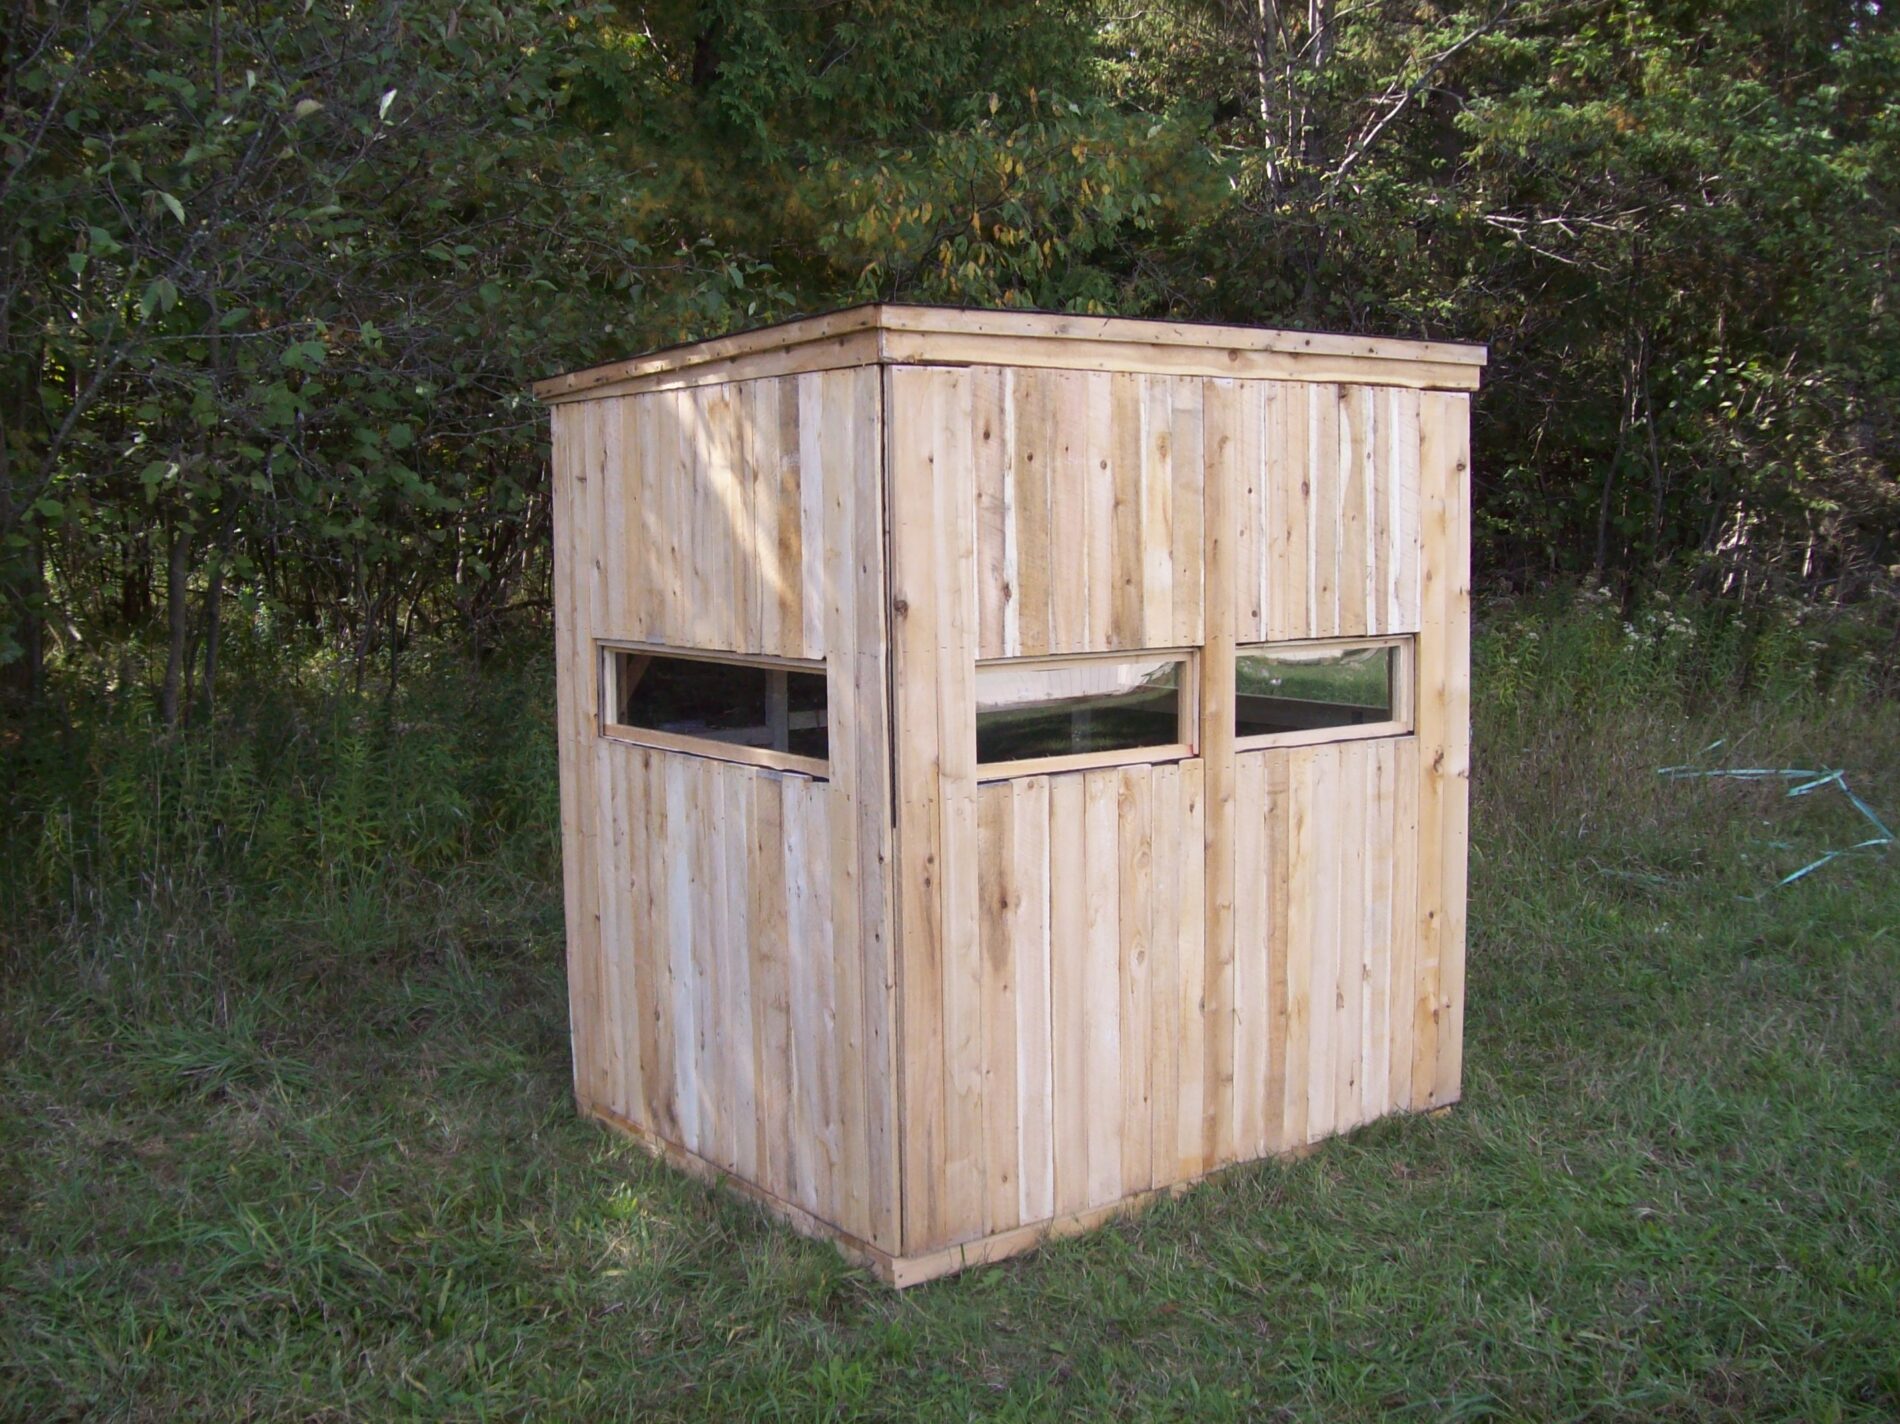
Your window frame must withstand moisture, temperature swings, and physical stress—especially at ground level where dampness is constant.
Use Cedar or Treated Pine for Longevity
Cedar is the top choice for frames due to its natural rot resistance and stability. Use 1.5″x1.5″ or 2×4 lumber for structural integrity. For bottom rails in contact with wet soil, pair cedar with pressure-treated pine for added protection.
✅ Pro Tip: Plane all wood to a uniform 3/4″ thickness before assembly. This ensures flat joints and smooth window operation.
If using finger-jointed walnut, rip along glue lines to eliminate weak points and prevent warping.
Cut Precise Gaps to Prevent Binding
The rough opening should be ½” larger than the window panel, with a consistent ¼” to 3/8″ gap around all edges. This allows for wood swelling and thermal expansion without binding.
Use ¼” or 3/8″ shims during installation to center the panel before fastening. One builder used three 3/8″ shims to perfectly align his plexiglass pane—ensuring years of smooth function.
Design Your Window for Silent, Reliable Operation
The best window design depends on your terrain, weapon, and weather conditions. Each type offers trade-offs between access, durability, and stealth.
Install Top-Hinged Flip-Up Windows for All-Weather Use
Awning-style (top-hinged) windows open outward and are among the most reliable. They naturally shed rain and avoid freezing in tracks. Use a full-length piano hinge for even support and secure the open position with parachute cord routed through the wall.
✅ Real-World Test: A 2012 build using piano hinges and cord lasted over a decade in Wisconsin winters.
Try Bottom-Hinged Kick-Down Panels for Bow Hunters
These fold inward or outward from the bottom, allowing the window to lie flat against the blind wall—maximizing vertical clearance for bow draws.
✅ Innovation: Mount the hinge to a separate walnut block, not directly to the wall, so the panel folds completely flat.
Avoid Side-Hinged Windows for Primary Shooting Openings
While fine for small vents, side hinges bind easily in cold weather and limit usable space. Not recommended for main shooting windows.
Build Sliding Windows with Drainage to Prevent Freezing
Sliders offer partial access without exposing your entire body—but require smart design to avoid failure.
Use Cedar Dado Channels or Vinyl Trim for Smooth Tracks
Cut dado grooves into 1×3 or 1×4 cedar boards using a table saw or router. Alternatively, use vinyl siding starter strip or plastic lattice as low-friction guides.
✅ Success Story: One hunter used dual saw cuts in treated 1x4s for tracks—survived 80 mph winds and lasted 17 years.
Prevent Freezing with Angled Tracks and Relief Cuts
Water collects in horizontal tracks and freezes solid. Fix this by:
- Angling the bottom track outward (5° tilt)
- Adding relief cuts at both ends for drainage
- Installing a roof overhang to keep snow off
⚠️ Limitation: Only 50% of the window is open at once—restricts gear movement and wide-angle shots.
Create Hybrid and Multi-Function Designs for Maximum Flexibility

Combine features to adapt to changing conditions and hunting styles.
Build “Window-in-a-Window” (Ranger Ray Style)
This layered design includes:
- Outer wooden panel drops down
- Inner plexiglass flips or slides
- On calm days: open all sections
- For rifles: lower just the plexiglass
- For bows: drop full panel for unobstructed shot
🎯 Benefit: Lets you scan with binoculars while hidden, then open fully when needed.
Try Magnetic Lexan Covers for Silent Access
Attach 10″x10″ Lexan panels with six rare earth magnets. Remove them silently for cleaning or full access.
- Secure with spring locks off-season
- Paint sight zones inside to align with magnet positions
- No hinges = no noise or maintenance
✅ Bonus: Commercial non-glare plexiglass now available for quieter operation.
Add External Wood Shutters for Extra Protection
Use brass piano hinges to mount outer flaps that flip up and double as awnings.
- Protects inner plexiglass from snow and debris
- Keeps critters out when closed
- Can be tied open with string from inside
✅ Upgrade Idea: Next build includes a 3″ high internal plexiglass strip for viewing, with full drop only for shooting.
Install Panels Without Cracking Using Proven Methods
Improper mounting ruins even the best materials. Avoid stress fractures with these field-tested techniques.
Slide Panels into Grooves for Secure Fit
Cut a 3/8″ deep groove in the frame using a table saw or router. Insert the panel and secure with a secondary strip.
✅ Wisconsin Build Example: Sandwiched plexiglass between two frame halves, one with a slightly undercut edge for grip.
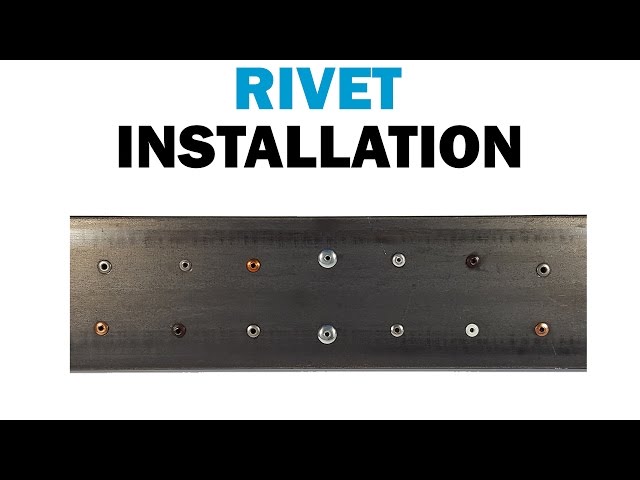
Use Pop Rivets Instead of Screws for Hinge Mounting
Never screw hinges directly into plexiglass—use aluminum pop rivets (3/16″ x 1″ x 1/4″) instead.
- Drill holes first with a 3/16″ bit
- Use three rivets per hinge
- Face rivet heads inward to protect the panel
✅ Why It Works: Rivets distribute pressure, resist corrosion, and prevent cracking from screw torque.
You’ll need a $10 rivet gun—a one-time investment.
Seal with Silicone and Trim for Waterproofing
Apply a generous bead of exterior silicone in the groove before inserting the panel. This bonds the material and stops water infiltration.
Reinforce with mechanical fasteners or trim if needed.
Weatherproof Every Seam to Block Wind and Rain
Even the strongest window fails if water seeps in or wind howls through gaps.
Apply Garage-Style Weatherstripping
Use rubber flap weatherstripping (like garage door seals):
- Cut two 10.5″ strips for top and bottom
- Remove ½” of flap at each end to prevent overlap
- Install bottom strip first, flap facing up
- Secure with treated pan-head screws (2 top/bottom, 5 per side)
⚠️ Caution: Weatherstrip moves during tightening—apply even pressure to avoid misalignment.
Caulk the Perimeter Inside and Out
Run a continuous bead of exterior-grade caulk around the entire window frame—both sides.
- Creates a final moisture barrier
- Forms a caulking ledge when acrylic sits 0.25″ inside the frame
✅ Pro Tip: Add vinyl close tabs (screen fasteners) on the interior for quiet, flush closure.
Select the Best Hardware for Smooth, Silent Operation
Hardware affects noise, durability, and ease of use. Invest in quality where it matters.
Use Piano Hinges for Large Panels
Full-length piano hinges distribute weight evenly and eliminate sagging. Ideal for awning-style or wide sliders.
For cabinet hinges (2″), use three per window and slightly angle the final screws downward to avoid interference.
Add washers as backer plates to spread load and prevent cracks.
Secure with Latches or Bungees
Options include:
- Clasp + latch system mounted on walnut block
- Top and bottom latches for stability
- Bungee cords for quick release
- String + nail—pull cord through wall and secure inside
✅ Support Tip: Install small side support boards to maintain compression and prevent hinge wear.
Prevent Fog, Freeze, and Glare for Clear Sightlines
Even the best build fails if you can’t see—or be seen.
Stop Fogging with Microfiber Wipes
Warm breath fogs windows fast. Keep a microfiber cloth or squeegee inside. Wipe frequently during cold mornings.
Never use paper towels—they scratch.
Eliminate Reflections with Tint
Sunlight bounces off clear plexiglass and alerts game. Fix it with:
- Tinted Lexan
- Camo window film
- Painting interior sight zones to match background
✅ User Feedback: Hunters report zero detection after switching to tinted panels.
Protect Against UV Degradation
All plastics degrade over time. Extend life by:
- Applying UV-protective coatings
- Replacing panels every 10–15 years
- Leaving protective film on until final install
Optimize Your Window for Your Hunting Scenario
Match your window to your environment and weapon.
Cold/Wet Climates: Use Top-Hinged with Overhang
In Wisconsin, Michigan, or similar zones, outward-opening hinged windows shed rain and resist freezing. Pair with a deep roof overhang.
High Wind Areas: Choose Sliders or Magnets
Sliders with reinforced tracks or magnetic panels stay secure in gusts. Avoid large flip-up windows on windward walls.
Bow Hunting: Maximize Vertical Clearance
Use drop-down or flip-up designs that clear your draw path. Hybrid “window-in-window” works best.
Rifle Hunting: Prioritize Stability
Sliders or partial-flip windows let you rest your rifle without full exposure.
Multi-Person Blinds: Widen the Opening
Build 4-foot-wide windows at 18″ height for dual access. Center hinges or sliders for balanced use.
Temporary Blinds: Use Duct Tape + Plexiglass
For fast, cheap setups: cut plexiglass to size, tape with duct tape, or staple marine vinyl. Remove and replace seasonally.
✅ Budget Win: One hunter used tdejong302’s method—functional, silent, under $10.
Final Note: The best hunting blind windows aren’t the most expensive—they’re the ones built with precision, simplicity, and field-tested details. Whether you copy a proven design or innovate your own hybrid, focus on smooth operation, full access, and stealth. With the right approach, your DIY window won’t just work—it’ll last longer and perform better than anything you can buy.


0 Comments