You’ve spent months scouting trails, hanging trail cameras, and fine-tuning your rifle at the range—only to freeze when a mature buck steps into view. The shot feels rushed, the position is unstable, and the bullet sails wide. It’s a common story. The truth is, rifle hunting tips that bridge the gap between range confidence and field performance are what separate consistent success from missed opportunities. Precision shooting isn’t just about a clean barrel or a perfect zero—it’s about mastering natural point of aim, building field stability, reading animal behavior, and making ethical decisions under pressure. This guide delivers battle-tested rifle hunting tips that go beyond basic marksmanship. You’ll learn how to prep your gear like a pro, shoot accurately from improvised positions, adapt to mid- and late-season patterns, and train your mind for real-world conditions.
Pre-Season Rifle & Optics Prep
Clean and Inspect Thoroughly
Start every season with a complete rifle inspection. Remove the bolt and clean the action with a quality solvent like Hoppe’s Gun Medic to eliminate carbon buildup and debris that could hinder cycling. Check the chamber and bore for obstructions—sticks, mud, or ice can prevent full bolt closure and create dangerous pressure spikes. Clean the barrel using a Bore Snake or cleaning rod with patches; for low-use rifles (under 20 rounds per year), aggressive copper solvents aren’t necessary. After cleaning, inspect all screws: tighten action screws (located at the front of the magazine and behind the trigger guard) and scope base screws. Loose scope rings are a leading cause of lost zero—re-tighten them annually, especially on systems like Leupold, which require scope removal to access base screws.
Verify and Re-Zero Your Scope

Even if you used the same ammo last season, recheck your zero every year. Temperature swings, transport vibrations, and storage shifts can alter alignment. Use a grid target (like Champion ScoreKeeper) with 1-inch squares to make MOA adjustments precise and error-free. For flat-shooting calibers like .308 or .30-06, set your scope 2 inches high at 100 yards—this extends your point-blank range to 250+ yards, minimizing holdover in the field. Always verify eye relief after re-mounting: too close risks “scope eye,” while too far reduces field of view and clarity. If you switch bullet weights or brands, re-zero—trajectory changes with velocity, weight, and design.
Match Practice to Hunting Scenarios
Stop shooting only from a bench. Real hunting involves fatigue, stress, and unstable positions. Spend range time simulating actual field conditions: range a target, assume prone or kneeling positions, and take timed shots after a short hike. Use your hunting backpack, tripod, or shooting sticks. Practice follow-up shots—keep your eye in the scope and track bullet impact through the glass. Push beyond your effective range (e.g., 600 yards) so 300-yard shots feel effortless. This builds confidence and exposes gear or skill weaknesses before opening day.
Master Shooting Fundamentals
Apply the Five Firing Fundamentals
Accuracy isn’t luck—it’s the consistent application of five core principles:
1. Aim precisely, but don’t over-stare—shaky focus increases wobble.
2. Control breath: Exhale, pause, and fire during the natural respiratory break.
3. Minimize movement by stabilizing your body and rifle.
4. Squeeze the trigger smoothly—no jerking or wrist twist.
5. Follow through: Hold your position and sight picture after recoil.
These steps work as one seamless sequence. A flaw in any breaks the chain.
Find Your Natural Point of Aim
Your body, not your arms, should align the rifle with the target. To test: aim at a distant object, close your eyes, relax, take a breath, then open your eyes. If the reticle drifted, adjust your stance—not the rifle—until it holds steady. This ensures recoil travels straight back, improving consistency. Pair this with a solid cheek weld to maintain consistent scope alignment and reduce parallax error.
Perfect Trigger Control
A jerky trigger pull ruins good shots. Place your thumb along the side of the stock (not wrapped around), which relaxes the trigger finger and improves precision. Use a crisp, adjustable trigger like a Timney for better control. Test for flinching with dry fire: drop the firing pin on an empty chamber. If you flinch, practice more dry fire until the movement stops.
Manage the Wobble Zone
The crosshair naturally dances in a small circle—the wobble zone. Bullets tend to land at its edge, not the center. Only take the shot if the entire wobble fits within the heart-lung zone. Reduce it by improving position, using support, and practicing under stress. If your heart’s racing after a stalk, pause 30 seconds to stabilize.
Build Stable Field Shooting Positions
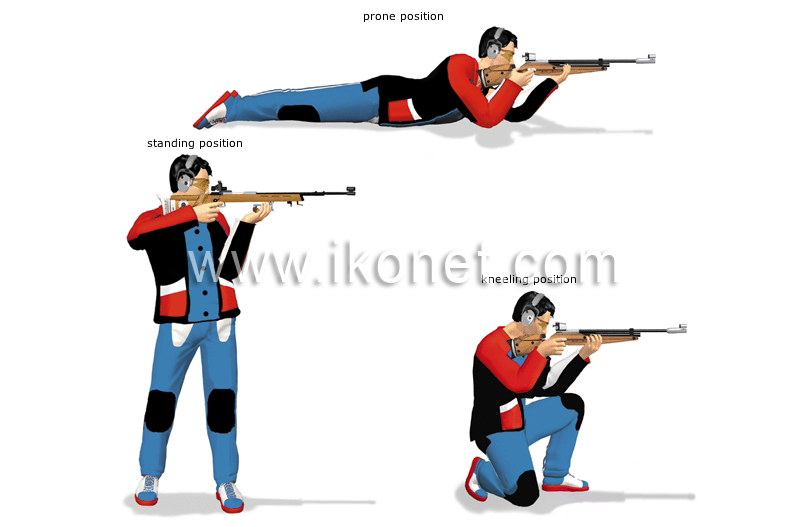
Use Prone for Maximum Stability
Prone is the most stable field position. Use a bipod up front and support the buttstock with a sandbag, daypack, or closed fist. A vinyl shooting harness worn around the neck can flip into a rear rest. On uneven ground, rest the barrel on a log and elevate the rear with your pack. Prioritize stability—comfort comes second.
Kneel for Sloped Terrain
On sidehills, kneeling beats standing. Set front support on shooting sticks or a tripod. Lean your backpack into your body (not away) for rear support. Place your right knee (for right-handed shooters) under your shooting hand and sit back on your heels for balance. Widen tripod legs and flip the pack’s top toward you to prevent forward tipping.
Stand Only When Necessary
Standing is least stable but sometimes unavoidable. Use natural supports: tree trunks, branches, stumps, or rocks. A full-height lightweight tripod or trekking poles with Velcro straps create instant shooting sticks. Small grip and stance tweaks reduce wobble—practice regularly to build muscle memory.
Sit for Visibility and Balance
Sitting is stable and lets you see over brush. Support the rifle on a pack, tree, or sticks. It’s underused but effective—especially when glassing from ridges. Practice this position so you’re confident when the moment arrives.
Hunt Smarter Mid-Season
Target Deep Cover After Opening Week
Deer go nocturnal after heavy pressure. Hunt remote thickets, cutovers, or brushy draws—pile into cover, not edge habitats. Hang stands deep inside, not on borders. New bucks may move in as others exit. Use still-hunting: move slowly along ridges (avoid skyline), glassing into creek bottoms. Light snow improves visibility.
Hunt Midday for Late Activity
Bucks that ran all night often rise between 10:00 a.m. and 12:00 p.m. to stretch, browse, or check for late-estrus does. Stay in the stand—don’t leave at noon. Focus on wind-sheltered draws and ravines, which act as natural funnels between bedding and feeding zones.
Adapt to Late-Season Patterns
Track Bucks Returning to Core Areas
Post-rut, many bucks return to pre-season home ranges. Pressure-exiled deer re-enter preferred zones. Hunt like early season: set up on funnels, ridgelines, or ambush points between beds and food sources. Use scrapes and rubs as signposts—they reveal travel routes and buck presence.
Use Rattling Strategically
Best three weeks into gun season, when pressure drops and bucks seek late-cycling does. Use light rattling to stop or turn a distant buck—avoid loud, aggressive sessions that spook animals. Set up in secluded thickets where bucks patrol for fights. Pair with grunt calls for realism.
Excel at Long-Range and Improvised Shots
Shoot Long from a Solid Prone Setup
For shots beyond 300 yards, prone is king. Lie commando-style, rest the rifle over your daypack, and bore elbows into the ground. Use high magnification, but start on low power to find the target fast. Read wind carefully—practice tracking mirage or treetop movement to detect shifts.
Create Improvised Rests in the Field
There are no benches in the woods. Train to use what’s available:
– Bipod on a stump with rear elevation from a rolled jacket
– Fallen log supported by rocks and a harness
– Trekking poles lashed with Velcro straps as shooting sticks
Carry a competition shooting glove for better rear support. Test setups during practice to build confidence.
Simulate Hunting Pressure in Training
Practice under stress: shoot after a 20-minute uphill hike with an elevated heart rate. Use a shot timer—aim for an 8–10 second par time from spotting target to firing. Add friendly wagers (e.g., loser buys dinner) to simulate adrenaline. Dry fire under fatigue to eliminate flinching and eye closure.
Train with Dry Fire and Mental Discipline
Build Muscle Memory with Dry Fire
Dry firing builds consistency and reduces recoil fear. Use snap caps for centerfire rifles. Aim for 25–50 dry fires per live round. After each dry fire, check: nothing should move except the firing pin. Practice the full sequence—unsling, load, assume position, safety off, fire.
Run Through the BRASS Checklist
Use B R A S S before every shot:
– Breath: Exhale, pause
– Relax: Release tension
– Aim: Align reticle
– Stop: Freeze body
– Squeeze: Smooth trigger press
The shot should surprise you—anticipating the break causes flinching.
Optimize Gear for Field Performance
Choose Supportive Shooting Aids
- Bipods: Best for open terrain and prone shots
- Shooting sticks: Versatile; convert trekking poles with straps
- Tripods: Lightweight models support standing shots to 300 yards
- Backpacks: Serve as rear rest in kneeling, sitting, or prone
Carry multi-use tools: a shooting glove, lashing straps, and a harness for improvised rests.
Upgrade Scope and Trigger
A scope with proper eye relief prevents injury and ensures a consistent cheek weld. Use low magnification for quick target acquisition, then zoom in for precision. An aftermarket trigger (e.g., Timney) delivers a crisp, light pull—boosting confidence and control.
Stick to Consistent Ammo
Changing loads shifts point of impact. Verify zero whenever you switch bullet weight or brand. Use the same ammo for practice and hunting if possible. Bullet design, velocity, and weight all affect trajectory.
Prioritize Safety and Shot Ethics
Follow Firearm Safety Rules
Never carry a loaded rifle in a truck or ATV scabbard. When climbing to a stand, unload first, tie the rifle muzzle-up to a rope, and hoist it after you’re secure. Always wear a safety harness. Know your target and what’s beyond—never shoot at a moving animal unless you can guarantee a clean kill zone.
Wear Blaze Orange
A blaze orange hat and vest make you visible to other hunters. Required in most states during rifle season. Don’t risk being mistaken for game.
Respect Ethical Shot Limits
Only take shots you can make consistently. Your effective range is the max distance you can hit a balloon-sized target under hunting conditions—not what your rifle can do on a bench. Aim for the heart-lung zone. Aim small, miss small—focus on a precise point like the shoulder seam. Never shoot beyond your capability.
Final Note: Success in rifle hunting isn’t just about gear or luck—it’s built on preparation, practice, and ethics. Master your rifle, train like you hunt, and respect the animal. With these rifle hunting tips, you’ll increase your odds of a clean, ethical harvest and deepen your connection to the wild.
0 Comments