If you’ve ever hiked deep into public land with a heavy treestand, only to find the perfect tree already taken—or worse, unsuitable—you’re not alone. More bowhunters are ditching bulky platforms for a lighter, smarter way to hunt: saddle hunting. This method uses a tree-hugging harness and climbing system to keep you elevated, silent, and connected to the tree at all times. It’s not just a trend—it’s a game-changer.
Saddle hunting lets you set up in any tree, rotate 360 degrees for clean shots, and move quickly between spots. But it’s not plug-and-play. There’s gear to learn, techniques to master, and safety rules that can’t be ignored. The good news? With the right guidance, you can go from curious beginner to confident saddle hunter in weeks—not seasons.
This guide breaks down exactly how to start saddle hunting, covering gear choices, step-by-step setup, safety protocols, comfort tips, and real-world cost breakdowns. Whether you’re on a tight budget or ready to invest in premium gear, you’ll know what matters most—and how to do it safely.
Choose Your Core Saddle System
Your tree saddle is the foundation of your entire setup. It supports your weight, connects to your tether and lineman’s rope, and determines your comfort during long sits. Picking the right one starts with fit, weight, and intended use.
Pick a Saddle That Fits Your Frame
A poorly fitting saddle leads to discomfort, restricted movement, and even safety risks. Most models come in small, medium, large, and XL sizes based on waist and hip measurements.
Key fit points:
– Waist belt (Freedom Belt) should sit snugly like a backpack hip belt
– Leg straps must be adjustable and secure without cutting circulation
– T-hooks attach to loops on the saddle—ensure they’re easy to reach and lock in place
Popular beginner-friendly options:
– Tethrd Mantis – Lightweight (~1.2 lbs), comfortable, great for first-timers
– CGM Cobra – Durable, affordable, excellent support for larger hunters
– Aero Hunter Kite – Minimalist design, ideal for minimalist or DIY setups
– XOP Mutant – Aggressive cut for mobility, popular among run-and-gun hunters
Tip: Watch sizing videos from manufacturers before buying—many offer detailed measuring guides.
Understand Saddle Features That Matter
Not all saddles are built the same. Look for these key features:
– MOLLE webbing – Lets you attach dump pouches, knife sheaths, or gear loops
– Bridge attachment loop – Large central loop where your bridge connects
– Lineman’s loop – Small reinforced loop for your climbing rope
– Yoke or suspenders – Optional upper-body support to reduce hip pressure
Avoid models without proper load testing. Reputable brands test their saddles to over 5,000 lbs breaking strength—a non-negotiable for safety.
Build Your Climbing & Safety Setup
Saddle hunting keeps you constantly connected to the tree. That means no unclipping during climbs or transitions. Your safety relies on two critical systems: the lineman’s rope for ascent/descent and the tether for stability at hunting height.
Set Up Your Lineman’s Rope Correctly
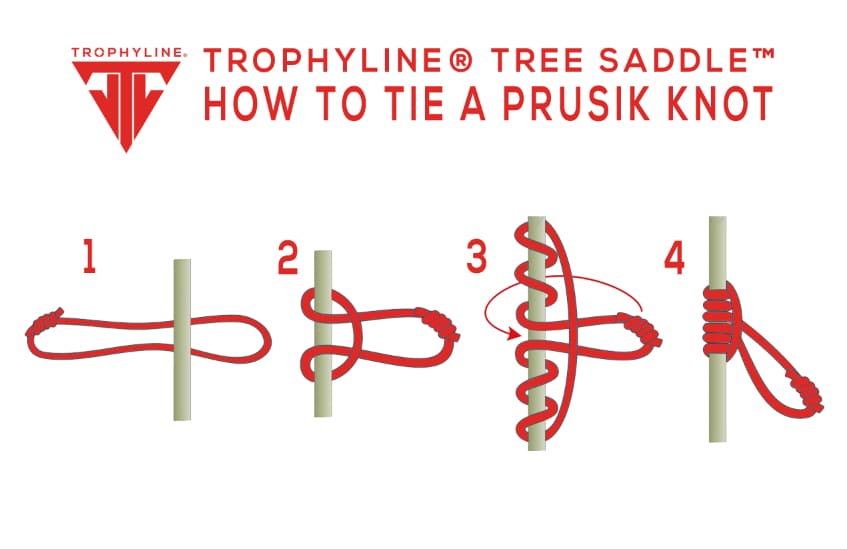
The lineman’s rope is your lifeline as you climb. It works with a friction hitch (like a Prusik knot) or mechanical ascender to let you move up safely.
What you need:
– Spliced-eye climbing rope (9–11mm diameter, static or low-stretch)
– Prusik knot or Ropeman ascender
– Locking carabiner
How to attach:
1. Girth hitch the spliced end of the rope to the lineman’s loop on your saddle
2. Tie a Prusik knot below your handhold position
3. Clip the carabiner to the tree or first climbing stick
As you climb, slide the Prusik up after each step. When weighted, it grips the rope. When lifted, it moves freely.
Pro tip: Pre-assemble this system and leave it attached to your saddle—it stays connected at all times.
Install a Strong Tether System
Once at height, you switch from the lineman’s rope to your tether, which anchors you to the tree while you hunt.
Steps to install:
1. Wrap the tether (rope, Amsteel, or webbing) around the tree at chest-to-forehead level
2. Feed the tail through the loop to create a girth hitch
3. Attach a carabiner with a Prusik or ascender
4. Clip your bridge into the carabiner and lock the gate
The tether should be tight enough to eliminate slack but allow smooth rotation. Rated for 6,000+ lbs, it’s designed to keep you secure without fail.
Avoid common mistakes:
– Placing the tether too low (reduces stability)
– Forgetting to lock the carabiner
– Using worn or frayed rope
Select Your Foot Support Strategy
Standing all day in a tree isn’t an option. You need foot support. Unlike traditional stands, saddle hunters use platforms, ring steps, or a hybrid approach—each with pros and cons.
Choose Between Platforms and Ring Steps
Platforms (Most Popular)
- Lightweight aluminum or composite (e.g., Tethrd Predator, Pursuit, Mission)
- Attaches to one side of the tree with a cam buckle strap
- Easy to install, packable, and quiet
Right-handed shooters place it on the left side, left-handed on the right—this positions your strong side toward open shooting lanes.
Why hunters love platforms:
– Comfortable for 6+ hour sits
– Reduces leg fatigue
– Can be repositioned mid-hunt if needed
Ring of Steps (Traditional Method)
- Screw-in or strap-on steps placed in a circle around the tree
- Allows full 360° foot placement
- More permanent; less portable
Best for landowners or repeaters who return to the same tree.
Hybrid Approach (Recommended for Beginners)
- Use a platform as your main support
- Add 1–2 strap-on steps opposite the platform for extended reach
Gives you flexibility without carrying excess gear.
Pick a Climbing Method That Fits Your Style
How you get into the tree depends on your physical ability, terrain, and gear budget. The three most common methods are climbing sticks, 2TC, and one-stick climbing.
Use Lightweight Climbing Sticks
Climbing sticks are the go-to for most beginners. They’re stable, easy to learn, and pair well with the lineman’s rope.
Recommended setup:
– 4 sticks (18″–24″ each)
– Lightweight models: Hawk Helium, Wild Edge SteppLadder
– Lock around the tree with cam straps or ratchets
Climbing process:
1. Place first stick at knee height
2. Step up, advance your lineman’s rope above your head
3. Place next stick within reach
4. Repeat until you reach hunting height
Keep a 10–12 inch gap between your belly and the tree for working room.
Try 2TC for Ultralight Ascents
Two Tether Climbing (2TC) uses two tethers—one as a handhold, one as a foot loop—to ascend without sticks.
Best for:
– Hunters covering long distances
– Minimalist setups under 10 lbs
– Steep or dense terrain where sticks are cumbersome
Steep learning curve, but highly efficient once mastered. Requires upper-body strength and coordination.
Consider One-Stick Climbing for Simplicity
Use a single climbing stick advanced up the tree as you climb. Paired with a lineman’s rope, it cuts weight dramatically.
Ideal for:
– Quick setups
– Short climbs
– Hunters who prioritize speed over comfort
Less stable than multi-stick systems but extremely portable.
Pack and Organize Essential Accessories
Your saddle does the heavy lifting, but accessories make the system functional. These small items improve safety, convenience, and effectiveness.
Must-Have Saddle Hunting Gear
| Item | Purpose |
|---|---|
| H Strap | Hangs your pack at hunting height |
| Quick Draw / Hero Clip | Securely holds your bow or rifle |
| S-Biner Clips | Attach sticks to your saddle for transport |
| Dump Pouches | Store gloves, tether, or climbing rope |
| Knee Pads | Reduce pressure when bracing against the tree |
| Pull-Up Rope | Retrieve bow after ascent (paracord + mini carabiner) |
| 20–30L Backpack | Carry sticks, platform, and extras |
Knee pads from hardware stores (like Lowe’s or Home Depot) work perfectly and cost under $25.
Pro tip: Use S-Biners to clip climbing sticks directly to your saddle—no swinging, no noise.
Follow the Step-by-Step Tree Setup

Now that you have your gear, it’s time to get into the tree. Follow this sequence to ensure safety, efficiency, and readiness.
Put On the Saddle Properly
Do this at your vehicle for short hikes, or at the base of the tree for longer treks.
Steps:
1. Step between the waist belt and bridge rope
2. Pull the saddle up and center it on your hips
3. Tighten the Freedom Belt snugly
4. Attach leg straps: T-hooks face down, right on right, left on left
5. Adjust for comfort—snug but not restrictive
If your model has yokes or suspenders, connect them now to relieve hip pressure.
Climb Safely With Sticks or 2TC
With climbing sticks:
– Place first stick at 18 inches off the ground
– Step up, advance your lineman’s rope above your head
– Always keep the rope above your current position
– Maintain tension on the Prusik or ascender
With 2TC:
– Alternate hand and foot ascents
– Use mechanical ascenders for faster progress
– Keep movements controlled and deliberate
Never rush. Test each step before committing.
Install the Platform and Tether
Platform placement:
– Right-handed? Install on left side
– Left-handed? Install on right side
– Wrap cam strap around tree, tighten, and lock
Tether installation:
– Girth hitch around the tree at chest height
– Attach carabiner with Prusik or ascender
– Clip bridge into carabiner, lock the gate
– Test by leaning back gently
For leaning trees, place the tether on the opposite side of the lean to balance your weight.
Transfer Weight and Remove Lineman’s Belt
This is the most critical safety moment.
Steps:
1. Slowly lean back into the tether
2. Confirm the lineman’s belt is slack
3. Unclip it from the tree and store in a dump pouch or sis hauler
4. Keep it attached to your saddle—it doubles as a suspension relief strap
⚠️ Always be double-connected during transition.
Master Shooting from the Saddle
You’re in the tree. Now what? Being able to shoot accurately from any angle is one of saddle hunting’s biggest advantages—but it takes practice.
Know Your Shot Angles
For right-handed shooters:
– Easiest: 1 o’clock to 5 o’clock
– Challenging: 7 o’clock to 11 o’clock (weak side)
– Drop-shot (6 o’clock): Often easier than expected due to body rotation
You can rotate fully around the tree by sliding your bridge through the carabiner.
Adjust Your Bridge for Clean Draws
Bridge length affects shooting comfort:
– Too short: Interferes with bowstring at full draw
– Too long: Reduces stability and control
Adjust before the hunt:
– On small trees: shorter bridge
– On large trees: longer bridge
– Test at full draw during practice
Use a second step or platform extension for hard-to-reach angles.
Practice Dry-Firing and Gear Handling
Before your first hunt:
– Dry-fire from all angles
– Practice hanging and retrieving your bow
– Simulate gear movement (pack on/off, radio use)
– Time yourself transitioning from climb to hunt mode
The more familiar you are, the calmer you’ll stay when a buck shows up.
Prioritize Safety Above All Else
Saddle hunting is statistically as safe or safer than traditional treestand hunting—but only if you follow strict safety rules.
Follow the Double Connection Rule
You must always have two points of attachment during transitions:
– Climbing: lineman’s rope + foot support
– Transition: lineman’s rope + tether both engaged
– Never disconnect one until the other is secure
Most accidents happen during the switch from climbing to hunting mode.
Inspect Gear Before Every Hunt
Check for:
– Cuts, frays, or abrasions in ropes and webbing
– Cracks or deformation in carabiners and platforms
– Loose stitching or worn buckles
– Proper function of ascenders and knots
Retire any damaged component immediately. No exceptions.
Train on the Ground First
Never use your saddle for the first time in the wild.
Practice steps:
1. Set up in your backyard at 1 foot off the ground
2. Put on the saddle, attach ropes, climb
3. Practice weight transfer and shooting
4. Repeat until smooth and confident
Watch tutorials from The Hunting Public, Saddle Hunting TV, and saddlehunter.com.
Optimize for Comfort and Long Sits
Many hunters report sitting 6+ hours comfortably in a saddle—sometimes longer than they could in a metal stand.
Reduce Fatigue With These Tips
- Use knee pads to cushion contact with the tree
- Wear supportive boots with good ankle support
- Adjust bridge length to maintain neutral posture
- Take micro-breaks during practice to stretch legs
- Use back support add-ons if available
Hunters with back, hip, or knee issues often find saddle hunting more comfortable than traditional stands.
“I’ve had multiple back surgeries. With a conventional stand, I’m lucky to last three hours. In my saddle? I’ve done multiple all-day sits.” – Chad Goethe
Manage Foot and Leg Discomfort
Feet may feel sore at first—especially if you’re used to flat platforms. This improves with repetition. Wear quality socks and consider insoles for added support.
Understand the Real Cost to Start
You don’t need to spend $1,000 to get started. Many hunters build effective systems for under $500.
Budget-Friendly Setup ($300–$500)
| Item | Cost |
|---|---|
| Used saddle (Tethrd, Land Baron) | $100–$150 |
| Used platform (Predator) | $125–$150 |
| DIY tethers and ropes | $80–$100 |
| Hero Clip (bow hanger) | $25 |
| Knee pads | $20 |
| Backpack | $20 |
| Pull-up rope | $10 |
| Total | ~$450 |
Buy used gear from saddlehunter.com classifieds or Facebook groups.
Mid-Range New Setup ($700–$800)
| Item | Cost |
|---|---|
| Tethrd Mantis or CGM Cobra | $250–$300 |
| Pursuit or Mission platform | $100–$150 |
| 4 lightweight sticks | $100–$140 |
| Tethers, carabiners, ropes | $100–$150 |
| Accessories (H strap, dump bags) | $50 |
| Knee pads, backpack | $30 |
| Total | ~$700–$780 |
Look for sales at major outdoor retailers.
Develop Skills With Practice and Community
Saddle hunting has a learning curve—but it flattens fast with deliberate practice.
Build Confidence With a Training Routine
- Backyard drills – Practice putting on saddle, attaching ropes
- Low climbs – 1–2 feet off ground, focus on smooth transitions
- Shooting practice – Dry-fire from all angles
- Gear handling – Hang pack, retrieve bow, adjust tether
- Tree selection – Learn to spot ideal trees (diameter, lean, limb clearance)
Spend at least 3–5 practice sessions before your first real hunt.
Learn From the Saddle Hunting Community
Join these resources:
– saddlehunter.com – Largest forum with gear reviews and advice
– YouTube channels – The Hunting Public, Saddle Hunting TV
– Local meetups – Many areas have practice days or demo events
Knowledge is shared freely—take advantage of it.
Final Note: Saddle hunting isn’t just a different way to sit in a tree. It’s a smarter, safer, more mobile approach that rewards preparation and practice. Start simple, train hard, inspect your gear, and hunt with confidence. After a few successful sits, you’ll wonder why you ever carried a heavy treestand into the woods.


0 Comments