You’ve spent months planning your deer hunt—scouting trails, checking tags, and packing gear. But if your rifle isn’t properly sighted in, none of it matters when that mature buck steps into the clearing. Sighting in a rifle for deer hunting isn’t just about punching paper at the range; it’s about building unshakable confidence that your first shot will drop the animal cleanly and ethically. Whether you’re using a .308, 6.5 Creedmoor, or .270, a precise zero ensures you’re not guessing when it counts.
This step-by-step guide reveals the exact process used by professional hunters and gunsmiths to achieve a reliable, field-ready zero. From bore sighting to final verification, you’ll learn how to get on target efficiently, avoid common mistakes, and optimize your zero so your bullet stays within the vital zone from 50 to 300 yards—no holdover, no guesswork. By the time you finish, you’ll know not just how to hit the bullseye, but how to trust your rifle under real hunting conditions.
Bore Sighting: Get On Paper Without Wasting Ammo
Before firing a single round, align your scope with the barrel to ensure you’re not shooting blind. Bore sighting saves time, ammo, and frustration—especially at 25 yards, where even small misalignments can send bullets off the target entirely.
Visual Bore Sighting (Bolt-Action Rifles)
If you own a bolt-action rifle, this is the most accurate way to start:
1. Secure your rifle on sandbags or a stable bench at 25 yards.
2. Remove the bolt and look straight through the barrel.
3. Center the bullseye within the bore opening.
4. Without moving the rifle, look through the scope and adjust the reticle to match the same point.
5. Use coarse adjustments first, then fine-tune with turret clicks until the crosshairs are perfectly aligned.
Pro Tip: Recheck alignment multiple times. Even a slight bump to the rifle can throw off your alignment—patience here saves rounds later.
Laser Bore Sighting (Non-Bolt Rifles)
For semi-autos, lever-actions, or ARs, visual bore sighting isn’t possible. Instead:
– Insert a laser bore-sighting device into the muzzle.
– Turn it on and aim at the target.
– Adjust your scope’s turrets so the reticle overlaps the laser dot.
Warning: Laser tools are convenient but less accurate than visual bore sighting. Always confirm alignment with live fire—never rely on lasers alone for hunting readiness.
Zero at 25 Yards: Confirm Mechanical Accuracy
Now that your scope is aligned, it’s time to fire your first group. This step verifies your rifle’s mechanical accuracy and gets you centered before moving to longer distances.
Fire a Three-Shot Group
- Set up a fresh target with 1-inch grid lines at 25 yards.
- Fire three shots using consistent technique: solid cheek weld, breath control, and smooth trigger press.
- Let the barrel cool slightly between shots to prevent heat distortion.
Measure and Adjust
- Walk downrange and find the center of the group, not individual shots.
- Measure how far (in inches) the group is from the bullseye.
- At 25 yards, 1 inch of movement equals 16 clicks on a standard ¼ MOA scope.
- Example: 2 inches high and 1 inch right → 32 clicks down, 16 clicks left.
- Adjust turrets using directional markings (“up/down,” “left/right”).
- Re-fire a new three-shot group after adjustments.
Key Rule: Never chase flyers. Always adjust based on group center, not outliers. One bad shot doesn’t mean your zero is off.
Confirm at 50 Yards: Catch Errors Early
While optional, a quick check at 50 yards builds confidence and catches alignment issues before you waste ammo at 100.
Why 50 Yards?
- Closer than 100, so small errors are easier to spot.
- Farther than 25, so adjustments scale more predictably.
- At 50 yards: 1 inch = 8 clicks (for ¼ MOA scopes).
Quick Verification Steps
- Move your target to 50 yards.
- Fire another three-shot group.
- Measure deviation and multiply by 2 to estimate 100-yard impact.
– Example: 1.5 inches low → expect 3 inches low at 100. - Adjust turrets accordingly and re-shoot.
Note: If your group is within 1 inch of the bullseye, you’re ready to move to 100 yards.
Live-Fire Zero at 100 Yards: Build a Hunting-Ready Zero
This is where the real zeroing happens. A cold-bore, three-shot group at 100 yards is the foundation of your hunting confidence.
Set Up for Precision
- Use a stable bench rest with sandbags under the fore-end and buttstock.
- Ensure proper eye relief—no scope shadow or cheek weld issues.
- Choose a calm, low-wind day to minimize environmental variables.
First Group: Cold Barrel Shot
- Start with a cold barrel—just like in the field.
- Fire a three-shot group at the bullseye.
- Do not fire single shots. Groups reveal true point of impact and consistency.
Calculate Adjustments
- Find the group center by averaging shot positions.
- Use grid lines to measure:
- Vertical (elevation): inches high/low
- Horizontal (windage): inches left/right
- Apply MOA math:
- At 100 yards: 1 MOA ≈ 1 inch
- ¼ MOA scope: 4 clicks = 1 inch
- Example: 3 inches low, 2 inches right → 12 clicks up, 8 clicks left
Visual Cue: Most turrets click audibly. Count carefully and confirm turret direction.
Confirm the Zero
- After adjustments, fire another three-shot group.
- If still off by more than 1 inch, repeat.
- Stop once two consecutive groups hit within 1 inch of the bullseye.
Best Practice: Let the barrel cool fully between groups. Heat causes vertical stringing and unreliable data.
Optimize for Deer Hunting Range: Beyond 100 Yards
A dead-on 100-yard zero works for close shots—but it’s not optimal for real-world hunting. Most shots fall between 100 and 300 yards, and your zero should reflect that.
Why Zero Beyond 100 Yards?
- A 200–275 yard zero keeps your bullet within the 8–10 inch vital zone across the entire range.
- Eliminates need for holdover or range estimation.
- Reduces stress during fast-moving shots.
Use the “3 Inches High” Rule
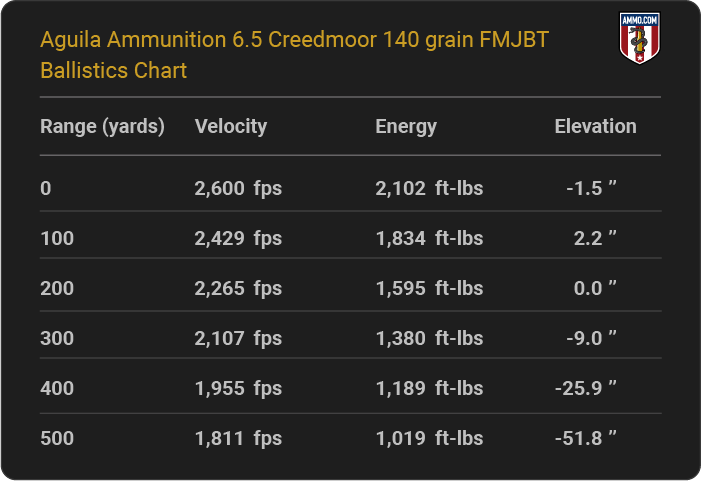
For most deer cartridges (.30-06, 6.5 Creedmoor, .270), sight in 3 inches above the bullseye at 100 yards. This simulates a 200–275 yard zero, giving you:
– Dead-on aim from 0 to 300 yards
– No need to dial turrets or estimate range
– Greater margin for error in field conditions
Caveat: At 100 yards, your bullet will be 3″ high—but still well within a deer’s chest cavity.
Choose Your Optimal Zero Distance
Use a ballistics calculator (like Hornady’s free app) to find your ideal zero. Input:
– Bullet weight and BC
– Muzzle velocity (measured with chronograph)
– Sight height above bore
– Vital zone size (±3 inches)
Top Zero Distances by Cartridge
| Cartridge | Optimal Zero (yds) | Max Point-Blank Range |
|---|---|---|
| 6.5 Creedmoor | 245 | ~300 |
| .308 Win | 247 | ~290 |
| .30-06 Springfield | 267 | ~310 |
| .270 Win | 270 | ~320 |
| 7mm Rem Mag | 260 | ~330 |
Pro Tip: For long-range setups, zero at 250–275 yards and verify at 100 and 300.
Avoid These Common Mistakes
Even experienced hunters make errors that ruin accuracy. Don’t let these slip past you.
Using Different Ammo
- Problem: Switching brands or bullet weights changes trajectory.
- Fix: Sight in with the exact same ammo you’ll hunt with.
Shooting Off Unstable Rests
- Problem: Elbows on steel tables shift with recoil.
- Fix: Use sandbags, a backpack, or a lead sled with soft padding.
Chasing Single Shots
- Problem: One flyer pulls you off target.
- Fix: Always shoot three-shot groups. Adjust based on average impact, not outliers.
Overheating the Barrel
- Problem: Hot barrels rise in point of impact.
- Fix: Wait 1–2 minutes between groups. Start each with a cold bore.
Assuming Last Year’s Zero Is Still Good
- Problem: Scopes shift from travel, drops, or temperature swings.
- Fix: Re-zero before every season, even if untouched.
Diagnose Shot Group Problems

Your target tells a story. Learn to read it.
No Grouping (Random Scatter)
- Likely Cause: Loose scope, rings, or bases.
- Check: Tighten all hardware to spec.
Consistent Flyer (Two Close, One Off)
- Cause: Ammo not tuned to barrel harmonics.
- Fix: Try different loads.
Inconsistent Flyer (Erratic Groups)
- Cause: Shooter flinch from recoil.
- Fix: Practice dry fire, use recoil pad.
Rising Group
- Cause: Barrel heating up.
- Fix: Cool between groups.
Vertical Stringing
- Cause: Fore-end jumping off rest.
- Fix: Support with hand or soft bag.
Horizontal Stringing
- Cause: Wind not felt at firing line.
- Fix: Use wind flags. Confirm conditions at target.
Verify Field Accuracy: Test Like You Hunt
A bench-rest zero doesn’t guarantee field success. Test from positions you’ll actually use.
Shoot From Real Hunting Positions
- Practice from:
- Prone (most stable)
- Kneeling with bipod
- Sitting on backpack
- Shooting sticks or tree rest
- Compare group size and POI to bench results.
Surprise: Some rifles shift POI by 1–2 inches when fired off-hand.
Simulate Real Conditions
- Hike 100 yards, then shoot.
- Practice with gloves, heavy coat, or cold hands.
- Use the same rest you plan to carry.
Record Your Zero Data
Create a waterproof log with:
– Ammo: Brand, model, bullet weight
– Scope settings: Elevation/windage clicks
– Zero distance and date
– Environmental notes
Store it in your gun case or phone app.
Final Note: A properly sighted-in rifle is the foundation of ethical hunting. Follow this process step-by-step, avoid the common traps, and verify your zero under real conditions. When that buck appears, you won’t just hope—you’ll know—exactly where the bullet will go.
0 Comments