Crafting a bow and arrow for hunting is more than survival know-how—it’s a bridge to ancient traditions, self-sufficiency, and deep respect for nature. Whether you’re shaping a powerful Osage orange selfbow or assembling a quick greenwood bow in the wild, the process demands precision, patience, and an eye for detail. A poorly made bow can fail catastrophically; a well-crafted one becomes an extension of your body, capable of cleanly taking game from 15 to 30 yards. This guide walks you through every critical step to make a hunting-effective bow and arrow system using natural materials. You’ll learn how to choose the best wood, dry and tiller your stave, construct accurate arrows, and even when to skip the bow entirely for better alternatives. If you’re serious about primitive hunting, this is your definitive roadmap.
Choose the Right Wood for a Hunting Bow
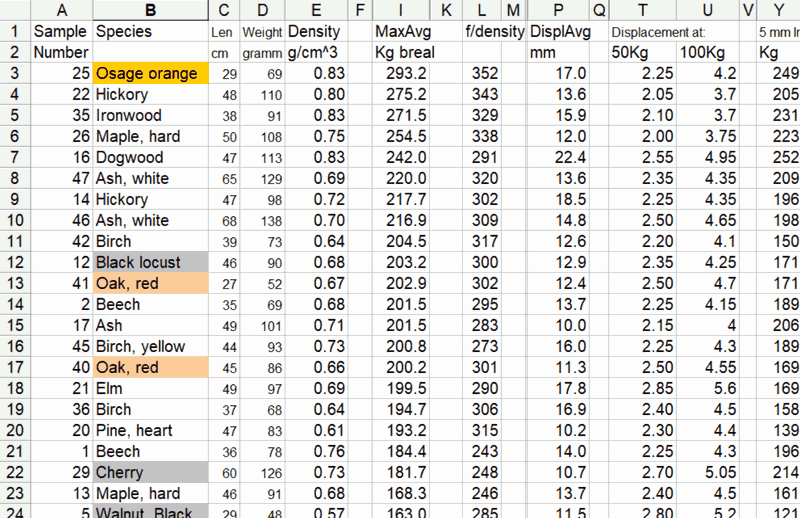
The strength, flexibility, and durability of your bow depend almost entirely on the wood you select. Not all hardwoods are suitable—many may look strong but snap under tension due to hidden grain flaws.
Best Bow Woods and Their Uses
- Osage Orange: The gold standard. Stores immense energy, lasts decades, and powers bows over 80 lbs. Ideal for elk or bear.
- Hickory: Tough and forgiving. Resists breakage, dries fast, and handles beginner mistakes—perfect for first-time builders.
- Black Locust: Nearly as strong as Osage, straight-grained, and rot-resistant. Excellent for long-term bows.
- White Ash: Reliable when fully seasoned. Avoid green ash—it’s prone to failure.
- Yew: Legendary for English longbows. Balances compression and tension beautifully, but rare and protected in many regions.
- Cedar: Lightweight and easy to carve. Best for low-draw (30–35 lb) bows effective at close range.
- Maple Saplings: Ideal for emergency builds. Use 1–1.25″ diameter greenwood for quick, flexible bows.
Avoid: Mexican plum (twisted grain), knotty wood, or any with spiral grain exceeding 45° over 6 feet—these create dangerous weak points.
Critical Selection Rules
- Straight grain is non-negotiable—any deviation risks sudden failure.
- No knots or limbs on the stave—these are stress concentrators.
- Intact back surface—the outer bark side bears tension when drawn; never gouge or cut into it.
- Minimum 4″ diameter for full staves; smaller for survival builds.
- Harvest in late winter—sap rise makes bark peel cleanly, preserving the cambium layer.
Cut your stave 1 foot longer than your height (e.g., 72″ for a 6′ person) to allow for warping or trimming. Immediately seal the ends with glue, paint, or pine pitch to prevent checking—cracks that can propagate under stress.
Dry the Stave to Prevent Cracking
Drying isn’t about waiting months—it’s about controlling moisture to avoid warping, twisting, or catastrophic failure.
How Long Does Wood Need to Dry?
- Green wood: Can be force-dried in 10–12 hours using heat.
- Air drying: Takes weeks, not years, if the stave is roughed out first.
- Target moisture: 8–10%—use a moisture meter to confirm.
Fast Drying Methods
Trench Drying (Field Method)
- Dig a 1-foot trench.
- Burn hardwood to coals.
- Suspend stave 6 inches above coals overnight.
- Cover with tarp to trap heat.
- Test moisture in the morning.
Best for hickory, elm, and maple. Avoid softwoods like pine—they scorch easily.
Indoor Drying (Controlled)
- Store at 70°F and 50% humidity.
- Weigh stave every few days. When weight stabilizes, it’s dry.
Never skip drying for permanent bows—green wood cracks under repeated stress and loses energy.
Prepare the Bow Stave for Shaping
Before carving, process the raw wood into a workable blank that preserves grain integrity.
Split, Don’t Saw
- Use wedges and sledgehammer to split the log down the center.
- Sawing cuts across grain—weakens structural integrity.
- Discard any piece with visible spiral grain.
Debark Without Damaging the Wood
- Use a drawknife or sharp knife.
- Peel in spring/summer when bark separates easily.
- Do not cut into the cambium layer—this living tissue is part of the wood’s strength.
Rough Out the Blank
- Shape sides to 2″ width using a hatchet or machete.
- Thin belly and sides to ¾ inch.
- Leave handle area (center 10″) at 1.5 inches thick.
- Expose the back—smooth, knot-free outer layer.
Keep transitions smooth—no sharp edges or sudden thinning.
Mark the Bow Design for Precision
A precise layout ensures balanced limbs and consistent performance.
Dimensions for a 64″ Bow (28″ Draw)
- Overall length: 64″
- Handle: 4″ long × 1 1/8″ wide
- Mid-limb width: 1.5″
- Nock width: 0.5″
- Handle depth: 2″
- Limb fade thickness: ~0.5″
Layout Process
- Rotate stave to find straightest back.
- Pop a chalk line down the center.
- Mark limb profiles:
– Flare from 1.125″ at handle to 1.5″ at mid-limb.
– Taper to 0.5″ at nocks. - Trace thickness fades from 2″ handle to 0.5″ limbs using a compass or saw blade.
This blueprint guides all shaping—deviate only to correct grain flaws.
Floor Tillering: Test the Initial Bend
Tillering ensures both limbs bend evenly—critical for safety and power.
Tools Needed
- Drawknife
- Cabinet scraper
- Long straight edge
- Pencil
Process
- Press one tip into the ground, hold the other.
- Flex to 6″ deflection—simulate draw force.
- Observe the bend:
– Look for smooth arc.
– Stiff spots? Mark them.
– Weak spots? Leave alone—they’re under stress. - Scrape belly at stiff areas with feather-light passes.
- Flex 5–10 times to let wood “remember” new shape.
- Retest.
Never remove wood from weak spots—they become dangerous hinges.
Repeat until both limbs mirror each other in bend.
Final Tillering with a Rack
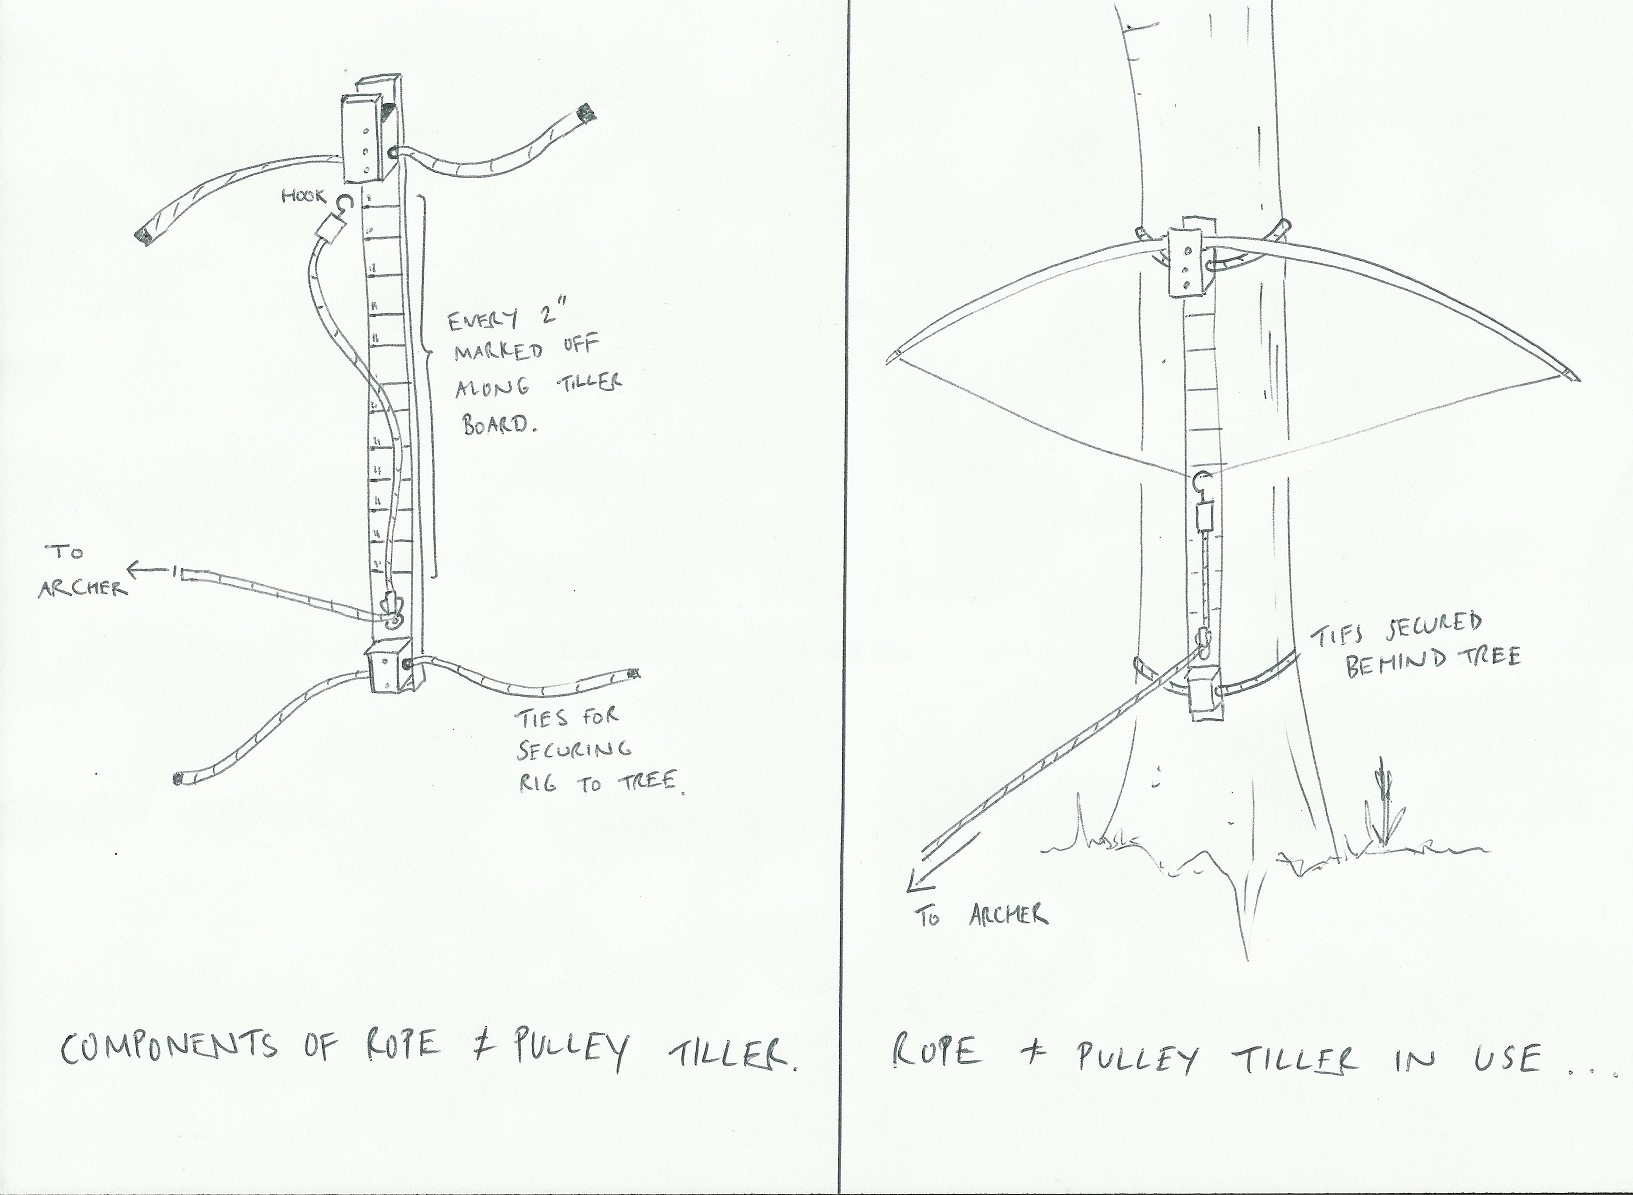
Once the bow bends enough to string, move to a tillering rack for precision.
Rack Setup
- Mount 5 feet high.
- Use rounded cradle so bow self-aligns.
- Ground-level pulley with rope.
- Use long string (a few inches longer than bow).
Tillering Steps
- String loosely.
- Pull rope gradually to draw bow.
- Step back and observe:
– Limbs should bend symmetrically.
– No flat spots or over-flexing. - Scrape belly at stiff areas.
- Shorten string as limbs flex more.
- When tips reach braced position, apply final brace (3–6″ of string height).
Danger Zone: A hinge (over-flexing spot) can explode on release—stop and correct immediately.
Reduce Draw Weight Safely
Even after bracing, fine-tune draw weight for hunting efficiency.
How to Lighten the Draw
- Remove tiny scrapes from belly near fade-out zones.
- Test after every 2–3 scrapes—small changes have big effects.
- Target 40–60 lbs for deer hunting.
- Final adjustments can be made while strung.
A 50 lb bow should feel smooth, not punishing, at full draw.
Apply Backset for Better Performance
Backset improves cast and efficiency by pre-bending limbs forward.
How to Heat-Set Backset
- Build a wooden form shaped to desired curve.
- Clamp bow into form.
- Use heat gun on belly side of each limb for 30 minutes.
– Keep ½ inch from wood, move constantly.
– Stop when wood darkens slightly. - Let cool in the form.
Result: Faster limbs, better energy transfer.
Finish the Bow for Durability
A proper finish protects the wood and enhances performance.
Cut the Nocks
- Round belly corners of tips.
- File semi-circular grooves for string.
– Use finger as guide.
– Never cut into the back. - Smooth all edges—rough spots wear string.
Sand and Seal
- Sand from 80-grit to 220-grit, finish with 00 steel wool.
- Seal thoroughly:
- Spar urethane or Tru-Oil: 7–8 coats.
- Bacon grease: Traditional, waterproofs and cures wood.
- Hickory absorbs moisture—sealing is essential.
Add Shelf (Optional)
- Cut shallow notch in handle.
- Do not extend into limbs—weakens structure.
Make Hunting Arrows That Fly True
A bow is only as good as its arrows. Precision matters.
Build the Shaft
- Select straight, knot-free wood (cedar, pine, bamboo).
- Cut to length (draw length + 1–2″).
- Straighten over coals:
– Heat evenly, bend gently, cool straight.
– Don’t scorch. - Sand smooth—uniform diameter.
Install Arrowheads
- Broadheads: Use for hunting; attach with epoxy.
- Fire-harden tips: For wooden points:
- Charring in coals.
- Sharpen with knife.
- Inserts: Use heat-set aluminum inserts for field points.
Fletch for Stability
- Split feather base—use larger side with natural curve.
- Torch off barbs, scrape smooth.
- Use jig to attach three feathers at 120°.
- Right helical (spiral) improves spin and accuracy.
- Glue with fletching cement, use heat gun to stop drips.
Helical fletching = better stabilization, especially for broadheads.
Add Front Wrap and Nock
- Front wrap: Braid or thread, glued and heat-set.
- Nock: Cut across the grain so it splits safely if damaged.
- Finish: Clear lacquer or sealer—cure fully.
Build a Survival Bow in Under an Hour
When time or tools are limited, make a functional bow fast.
Quick Build: Greenwood Bow
- Wood: Maple, hazel, or yew saplings (1–1.25″ diameter).
- Advantage: Flexible, less likely to break when green.
Steps
- Cut greenwood to 64–72″.
- Debark carefully, preserve cambium.
- Taper limbs:
– Side profile: ½” thick at tips, thicker at handle.
– Front profile: Narrow last 6–8″ to form tips. - Floor tiller: Only remove from stiff areas.
- String with paracord or bootlace:
– Length: 10″ longer than bow.
– Top: Fixed loop.
– Bottom: Timber hitch for adjustability. - Cut clean nocks.
- Brace at 3–6″.
- Retillering: Check every few days—wood dries and stiffens.
Expect draw weight to increase as it dries—start light.
Try a Bundle Bow for Emergency Use
When one sapling isn’t strong enough, bind several.
How to Build
- Collect 3–5 straight saplings of equal length and thickness.
- Bind tightly with cordage, sinew, or plant fiber.
- Align thickness—no weak spots.
- String and tiller as one unit.
Arrows
- Sharpened sticks.
- Fire-hardened tips.
- Fletch with bark strips or feathers.
Less powerful but can take small game.
Consider Better Alternatives to a Bow
Sometimes, a bow isn’t the best hunting tool—especially in survival.
More Efficient Options
- Snares:
- Figure 4 deadfall: 3 sticks, rock, bait.
- Pit trap: Hole with stakes—effective for rabbits, raccoons.
- Spears:
- Fast to make, good for fish, porcupines, or close ambush.
- Atlatl (Spear-Thrower):
- Increases force and range.
- Easier to master than bow accuracy.
- Slings:
- Cordage + rock.
- Lethal with practice—David vs. Goliath style.
“A good bow takes 1–2 days. That energy is better spent on snares or fishing.” – csalinas116
Test Before You Hunt
Never assume your bow is safe or accurate.
Performance Checks
- Draw weight: Use scale—aim for 40–60 lbs for deer.
- Brace height: 3–6″—adjust string as needed.
- Arrow flight: Shoot at 10 yards:
- Tail left? Fletching issue.
- Tail high? Nock too high.
- Tight groups at 9 yards? You’ve got craftsmanship.
Real-World Success
- Cedar bow at 35 lbs: Effective at 15 yards on deer.
- Osage orange: 80+ lbs, takes elk and bear.
- One archer: Over 30 big game kills with handmade gear.
Hunt Safely and Ethically
Primitive hunting demands responsibility.
Safety Rules
- Always wear eye protection during construction.
- Inspect for cracks, hinges, or weak spots before every use.
- Never dry-fire—it can shatter the bow.
Ethical Hunting
- Ensure clean kills—use sharp, appropriate broadheads.
- Only shoot within effective range (15–30 yards).
- Respect wildlife—harvest sustainably.
Environmental Care
- Harvest wood ethically—take deadfall or “V-tree” limbs.
- Never kill a healthy tree for one bow.
Making a bow and arrow for hunting isn’t just about function—it’s about mastery. It takes patience, practice, and a willingness to fail. But when you draw back your handmade bow and take game with it, you’re not just surviving—you’re connecting to a lineage of hunters thousands of years deep. Start small. Build often. Hunt wisely.


0 Comments