If you’re serious about deer hunting, visibility and concealment can make or break your success. A well-built tower stand gives you the elevation needed to see over thick brush, wetlands, or tall grass—while keeping you hidden from sharp-eyed deer. Unlike store-bought models, a DIY tower stand can be customized for your terrain, budget, and hunting style. This guide walks you through every step of how to build a tower stand for deer hunting, using proven structural principles, affordable materials, and smart safety practices. You’ll learn how to construct a stable platform, secure support legs, add safe access, and camouflage your blind—all with basic tools and common lumber.
Whether you want a permanent hunting post anchored in concrete or a portable, disassemblable blind you can move across your property, this guide covers both. With total costs ranging from $240 to $600 and build times under a weekend, a custom tower stand is a practical upgrade that pays off in better shot opportunities and longer-lasting use.
Design Your Hunting Tower for Maximum Stability and Function
Define Purpose, Size, and Height
Start by deciding how you’ll use the stand. Will it be for solo scouting, multi-hunter setups, or late-season ambushes? Most DIY tower stands are built for 1–2 people, with platforms sized 4×5 ft to 8×6 ft. A 6×8 ft platform offers ample room for gear and movement.
Choose a height between 6 and 10 feet—tall enough to see over cover but low enough to remain stable without complex bracing. Consider your local terrain: wetlands may need taller legs, while wooded areas benefit from lower profiles.
Choose Between Permanent and Portable Construction
- Permanent: Best for fixed hunting spots. Uses a concrete-anchored 4×4 base for unmatched stability.
- Portable: Ideal for rotating locations. Built on a ground-level 2×6 frame that can be lifted, moved, and reassembled.
Both designs use similar materials and framing techniques, so pick based on how often you plan to relocate.
Plan for Safety, Comfort, and Long-Term Use
Always design with safety first. Include:
– Handrails on ladders or stairs
– Diagonal bracing to prevent sway
– A level platform (use a torpedo level during assembly)
– Guy lines for wind resistance
Add comfort with a sloped roof (15° pitch), shooting rails at window height, and optional storage shelves inside.
Build a Stable Base That Won’t Shift or Sway
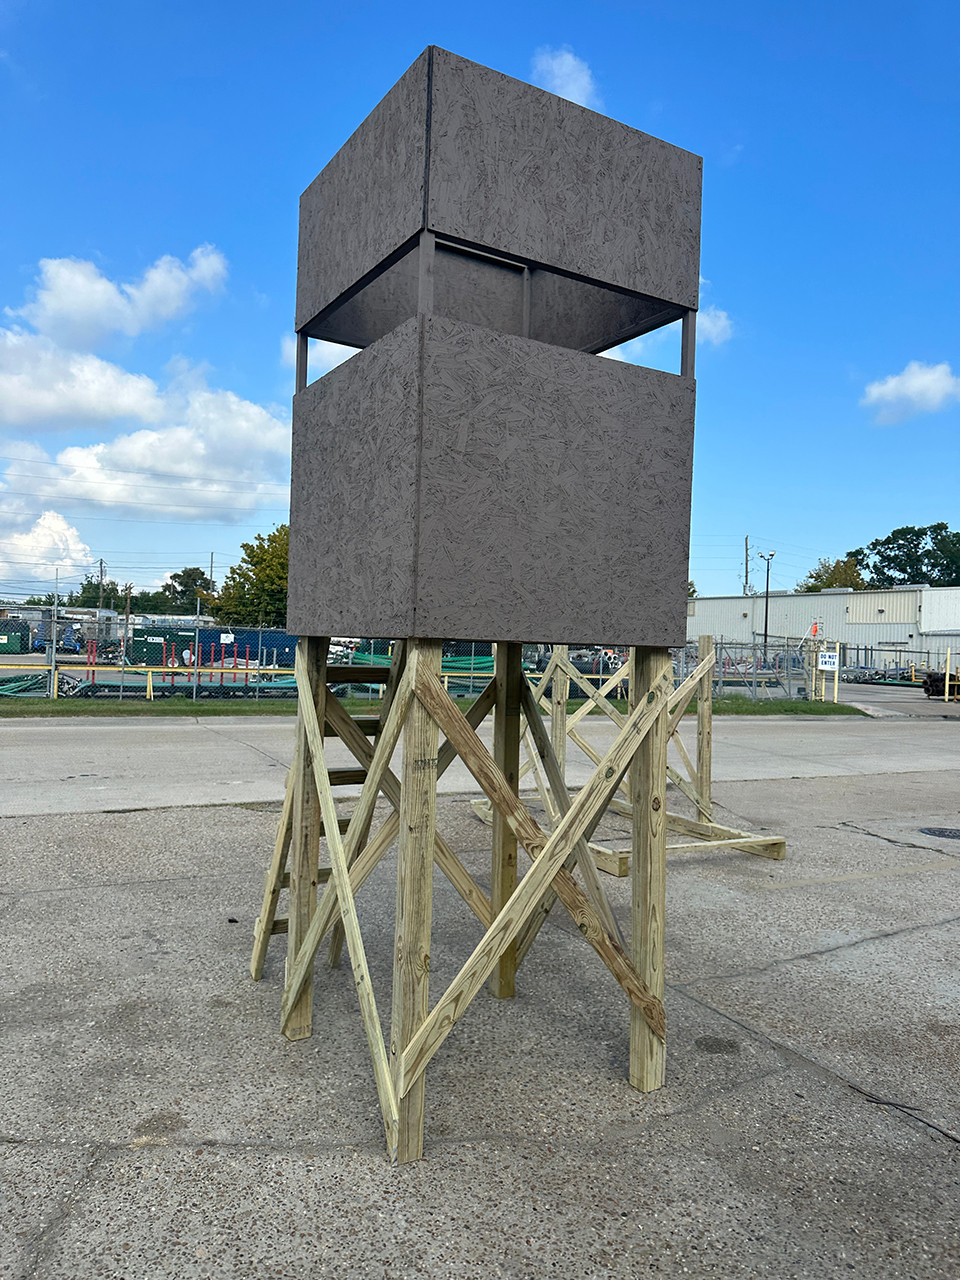
Anchor 4×4 Posts in Concrete for Permanent Stability
For long-term stability, anchor four 4×4 pressure-treated posts in concrete:
– Dig holes 24–30 inches deep, spaced 8–10 ft apart in a rectangle.
– Insert posts and align with a level.
– Pour one 60-lb bag of concrete per post.
– Slope the top of the pad 1/8 inch per foot away from center for drainage.
– Wait 24–48 hours before building upward.
This foundation resists shifting and supports heavy loads for years.
Assemble a Portable Frame for Easy Relocation
If you prefer mobility, build a ground-level frame from 2×6 or 2×8 pressure-treated lumber:
– Cut two 8-ft and two 6-ft boards for an 8×6 ft footprint.
– Assemble with 3.5-inch screws or 3-inch lag bolts and washers.
– Check for squareness by measuring corner-to-corner diagonals—both must match.
This frame sits directly on the ground and supports the entire tower. It’s easy to transport and reposition.
Construct a Rigid Platform Frame to Support Weight and Movement
Install 2×8 Joists and Rim Boards Every 2 Feet
Use 2×8 or 2×6 lumber for strong support:
– For an 8×6 ft platform:
– Two 8-ft boards (outer lengthwise)
– Two 5’9″ boards (internal cross supports)
– Space internal joists every 2 feet for even weight distribution.
– Secure all joints with 3.5-inch screws or lag bolts with washers to prevent splitting.
Ensure the frame is rigid and level before adding decking.
Add Durable Decking That Resists Wear and Moisture
Cover the frame with one of these options:
– ¾-inch pressure-treated plywood (one or two sheets)
– 2×8 decking boards, spaced ¼ inch apart for drainage
Screw each board at every joist using 3-inch lag bolts with washers. If using plywood, add a rubber or foam pad on top to reduce noise and protect against boot wear.
Pro Tip: Reclaimed pallet wood works if sanded, treated, and secured properly—just inspect for rot or nails.
Attach 4×4 Support Legs at a Slight Outward Angle
Cut and Position Legs for Optimal Balance
Use 8–10 ft 4×4 pressure-treated posts as legs:
– One at each corner of the platform.
– Angle legs 2–5° outward to improve balance and load handling.
Outward angling lowers the center of gravity and resists tipping.
Secure Legs with Carriage Bolts and Reinforcements
Attach legs to the underside of the platform frame:
– Use three ½-inch x 10-inch carriage bolts per leg (two through side posts, one through floor joist)
– Or use multiple 3.5-inch lag bolts from both sides
Reinforce with wood blocks or metal brackets at connection points. Always use washers under bolt heads to spread pressure and prevent wood crushing.
Warning: Never rely on screws alone for leg attachment—use bolts for safety.
Reinforce the Structure with Diagonal and X-Bracing

Install 2×4 Diagonal Braces to Prevent Lateral Movement
Prevent sway with 2×4 diagonal braces from leg base to platform:
– Cut at 45-degree angles.
– Attach with 3-inch or 4-inch lag bolts and washers.
– Avoid over-tightening to prevent wood splitting.
These braces stop side-to-side movement, especially in wind.
Add X-Bracing Across Shorter Sides for Truss-Like Strength
For added rigidity:
– Run 2x4s diagonally across shorter sides to form X-bracing
– Attach from inside the frame lip into the legs
– Pre-tension braces before final tightening
X-bracing turns the structure into a truss system, greatly improving stability.
Expert Note: Lag bolts hold better than screws in high-stress joints—use them on all braces.
Build Safe and Practical Access with Ladder or Staircase
Install a Simple 2×4 Ladder for Portable Stands
Use 12-ft 2x4s for side rails (extra length allows safe angle):
– Cut 24-inch wide steps from 2x4s
– Space rungs 12–16 inches apart
– Attach with 3.5-inch screws driven only 2.5 inches deep to avoid sharp ends
Secure the top of the ladder to the platform with a support block and lag bolts. Mount the ladder on the inside of the tower for better weight balance.
Upgrade to a 2×12 Staircase for Permanent Use
For permanent stands, build a safer staircase:
– Use 2×12 treads, cut to 24 inches
– Cut 2×4 stringers with a miter saw to match platform height
– Create a cutting jig from scrap wood for consistent spacing
– Attach treads with 3-inch lag bolts and washers, spaced 10–12 inches apart
– Allow 1–2 inch overhang beyond stringers for better footing
A staircase is easier to climb with gear and safer in wet conditions.
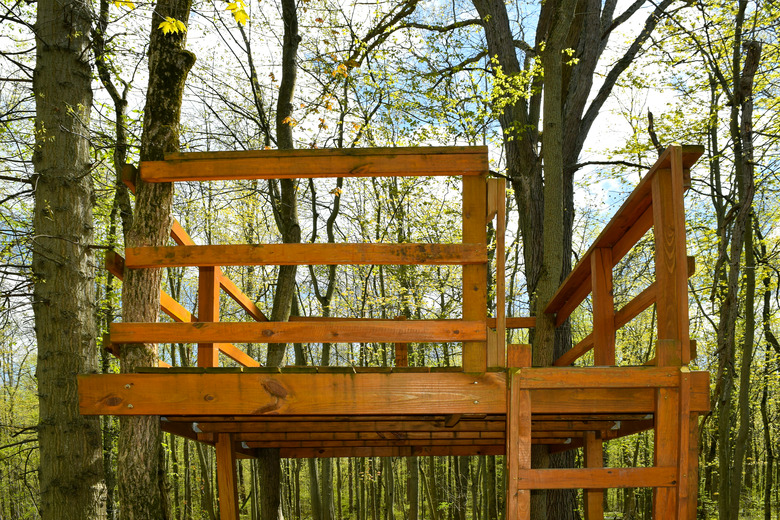
Install 36-Inch Handrails and Wind-Resistant Guy Lines
Mount 2×4 Handrails Along Stairs or Ladder
Install 2×4 handrails along the full length of stairs or ladder:
– Set height at 36–38 inches above treads
– Attach with 3-inch lag bolts and washers every 16–24 inches
– Place on the inside of the structure for easy reach
Handrails prevent slips and boost confidence when climbing with a rifle.
Use Guy Lines to Stabilize in High Winds
Attach guy lines to ½-inch carriage bolts extending through the floor frame:
– Run lines to 15-inch ground stakes or nearby trees
– Tighten with tensioners or knots
– Essential in winds over 30 mph
Guy lines stabilize the entire structure and prevent dangerous swaying.
Safety First: Never occupy the stand in high wind without guy lines.
Frame Walls and Build a Shed-Style Roof
Rise 2×4 Wall Posts from the Platform
For enclosed blinds, rise 2×4 wall posts from the platform:
– Front posts: 78.5–82 inches tall (for visibility)
– Rear posts: 65.5–70 inches tall (for sloped roof)
– Angle tops at 15 degrees to match roof pitch
Attach posts using:
– Tenon joint: Cut 2″ square tenon into post bottom; insert into floor frame and bolt
– Top-mounted: Place post on plywood, reinforce with 2×4 block underneath
Construct a Single-Pitch Roof with Overhang
Build a shed-style roof:
– Taller side: 6’6”, shorter side: ~5’6”
– Overhang only on back to block rain at door
– Frame with 2x4s and fence boards
– Add center brace if snow load is expected
Sheath with:
– 3/8-inch OSB (budget option)
– Corrugated plastic (lightweight, durable)
– Fasten with gasketed roofing screws to prevent leaks
Seal seams with duct tape or silicone caulk.
Cut Operable Windows, Build a Rear Door, and Add Ventilation
Install String-Operated Flap Windows
In front and side walls, cut flaps from corrugated plastic:
– Use string “pull” system:
– Tie string to flap bottom
– Run through hole in top wall
– Attach to stick handle; tie off to hold open/closed
– Add corner strings to keep flaps shut in wind
This gives quick access for shots and airflow.
Build a Rear Door with Flexible Hinges
Place door on shorter rear wall:
– Use vertical ribs of corrugated plastic as hinges
– Close with bungee cord to eye hook
– Add internal tie to prevent accidental opening
Keeps wind and rain out while allowing easy exit.
Include a Plexiglas Ventilation Window
Add at least one sliding or hinged Plexiglas window:
– Lets air flow to reduce scent buildup
– Can open partially for fast shooting lanes
– Improves comfort during long sits
Camouflage and Seal the Blind for All-Weather Use
Clad with Black Corrugated Plastic for Stealth
Cover walls and roof with black corrugated plastic:
– Lightweight and water-resistant
– Ribs add strength and dampen noise
– Absorbs heat, reducing glare
Alternatives: Camo netting, canvas, or white plastic (paintable).
Paint for Maximum Concealment
- Exterior: Spray with gray and white to mimic tree canopy and shadows
- Interior: Paint black to eliminate reflections and improve hiding
Dark interiors make hunters nearly invisible from outside.
Seal All Seams and Joints
- Seal seams with duct tape or roofing sealant
- Use gasketed screws on roof and walls
- Add water-deflecting flaps over leg end grain
- Prevent moisture wicking into wood
A dry, quiet blind keeps you comfortable and undetected.
Raise, Transport, and Position Your Tower Stand Safely
Lift with a Golf Cart and Rope System
Use a golf cart and rope over a tree crotch:
– Attach snap strap to base
– Lift slowly while guiding from ground
– Once upright, roll into final position
Two people can also lift it from a truck bed:
– One lifts from cab side
– One guides past balance point
Disassemble for Easy Portability
Design for easy breakdown:
– Use only two main screws to attach walls (in some models)
– Remove legs and store separately
– Fit entire blind in a pickup truck (tailgate down)
Portable stands let you adapt to changing deer patterns.
Estimate Total Cost and Prepare the Right Tools
Budget $240–$600 for Materials
| Item | Cost Range |
|---|---|
| 4×4 pressure-treated posts | $40–$110 |
| 2×8 lumber | $80–$100 |
| 2×4 lumber | $70–$100 |
| Plywood (½”–¾”) | $30–$65 |
| Corrugated plastic (10 sheets) | $136–$210 |
| Lag bolts, washers, nuts | $40–$60 |
| Carriage bolts (½”x10″) | $30–$40 |
| Concrete (1–4 bags) | $10–$40 |
| Roofing screws | $10–$15 |
| Duct tape, sealant | $10–$15 |
| Handrail lumber | $15–$25 |
Save Money: Use reclaimed wood, discount lumber, or salvage materials.
Use Common Tools You Already Own
No specialty tools required:
– Circular saw or miter saw
– Drill/driver
– Tape measure
– Level (torpedo and 24-inch)
– Speed square
– Wrench set (for bolts)
– Utility knife
– Ladder (for assembly)
All are common on most job sites or in home garages.
Test, Maintain, and Customize for Long-Term Success
Check Stability and Performance in Real Conditions
Hunters report:
– Stable in wind with guy lines
– Quiet operation with rubber padding
– Deer acclimate when blind is left in place
– Lasts 5–10 years with maintenance
No commercial warranty, but fully repairable and upgradable.
Perform Annual Maintenance
- Inspect all bolts, braces, and legs
- Re-tighten loose connections
- Replace worn decking or cladding
- Touch up paint and sealant
- Check guy line anchors
A little upkeep extends life and ensures safety.
Customize for Your Hunting Style
- Add shooting rails at window height
- Install a gear shelf inside
- Wrap exterior in camo netting
- Use removable roof panels for summer hunts
Tailor your stand to match the season and terrain.
Final Note: Building a tower stand for deer hunting is a smart, satisfying project that puts control in your hands. From foundation to camouflage, every part can be optimized for your land and style. Follow these steps, prioritize safety, and create a high-performing hunting post that lasts for seasons. With clear visibility, solid footing, and full concealment, your new tower stand will become your go-to spot for tagging mature bucks.


0 Comments