Every winter, across forests, fields, and forgotten corners of rural America, a quiet phenomenon unfolds—whitetail bucks shed their antlers. These bone-colored trophies, dropped naturally after the rut, become the target of an ever-growing pursuit: whitetail shed hunting. More than just a scavenger hunt, this seasonal ritual blends scouting, fitness, and deep connection to the natural world. Whether you’re a beginner or a veteran outdoorsman, applying proven whitetail shed hunting tips can turn aimless hikes into productive treasure hunts.
Most antlers drop between late February and mid-March, but timing varies by region, deer health, and winter severity. The secret to success? Knowing when to go, where to look, and how to search smart. With the right strategies, even a short afternoon walk can yield a matched set. Forget luck—consistent results come from preparation, patience, and persistence.
Why Bucks Drop Antlers—and When It Happens
Shedding is a biological process triggered by falling testosterone levels after the breeding season. Once the rut ends, specialized cells called osteoclasts begin dissolving the bone at the antler’s base—the pedicle—until the connection weakens and the antler falls free. This process is natural and painless.
But not all bucks shed at the same time. Dominant, mature bucks that bred heavily often drop early—sometimes in December or January—due to physical exhaustion. In contrast, younger or non-breeding bucks may hold antlers into March or even April.
Other factors that speed up shedding:
– Harsh winter weather
– Poor nutrition
– Injury or illness
– Genetic predisposition
Pro Insight: If you see a buck with one antler still on in March, he likely didn’t participate much in the rut.
Start your search too early, and you risk pushing deer off private land. Wait too long, and squirrels, coyotes, or weather may damage or scatter your prize. In most regions, the second week of March is ideal—after peak shedding and snowmelt. Northern states like Michigan or Wisconsin should target late March, while southern zones (like Georgia or Tennessee) often peak in early March due to milder winters.
Target the 20% of Land Where 80% of Sheds Are Found
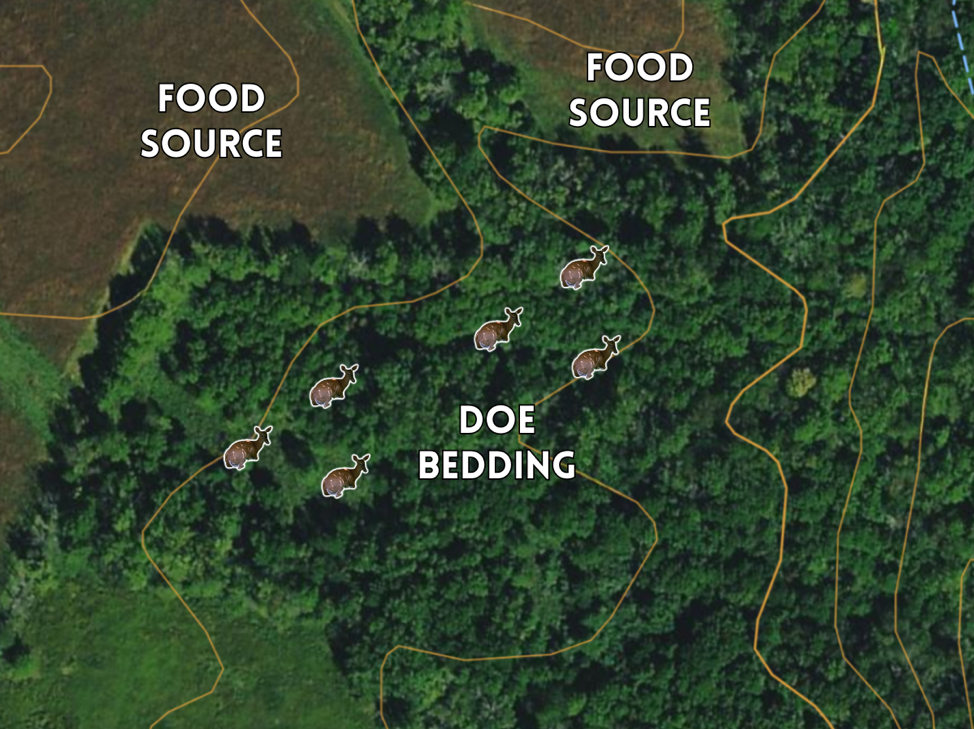
Forget random walking. The 80/20 rule applies to shed hunting: 80% of sheds are found in just 20% of the habitat. Focus on high-use zones where deer feed, bed, and travel.
Prioritize Food-Rich Zones
Deer spend winter days searching for calories. Concentrate your efforts where they feed:
- Standing crops: Corn, soybeans, and brassica plots attract deer all winter.
- Green fields: Winter rye, clover, or alfalfa stays green and draws deer in mild climates.
- Acorn ridges: Oak stands with leftover mast are hotspots into early spring.
- Supplemental feeding areas (where legal): Mineral licks, hay piles, and feeders act as magnets.
Warning: Skip barren food plots. If there are no tracks or droppings, deer aren’t using it.
South-facing slopes are goldmines. Warmer sun exposure melts snow faster, revealing early green-up and tender browse—prime deer magnets in late winter.
Hunt Bedding Areas with Thermal Cover
Deer bed where they feel safe and warm. Focus on:
- Conifer stands (pine, cedar): Provide windbreaks and snow protection.
- CRP fields, brushy thickets, and cattail sloughs: Offer hiding and thermal cover.
- Fence-line edges and ditches: Natural security corridors.
- Slopes with southern or eastern exposure: Warmer and more accessible.
In brutal cold, deer may use north-facing slopes or swamps for shelter—don’t ignore them. In Ohio, for example, deer favor east or southeast-facing slopes due to prevailing northwest winds.
Search Choke Points and Travel Corridors
Antlers often fall during movement, especially at high-impact spots. Check:
- Fence crossings: Barbed wire and rail fences force bucks to jump—landing impact can dislodge loose antlers.
- Creek or ditch crossings: Natural bottlenecks where deer funnel through.
- Blowdowns and downed trees: Require awkward movements.
- Saddles and ridgeline pinch points: High-traffic funnels between ridges.
Key Tip: Check the landing side of jumps. Antlers often fall when the buck hits the ground.
Search Like a Pro: Techniques That Work
Use Systematic Search Patterns
Random hiking misses sheds. Use these proven methods:
- Grid search: Break a field or woodlot into sections. Use an app like onX Hunt to map boundaries and avoid overlap.
- Zig-zag pattern: Walk diagonally across hillsides, advancing 20–50 yards per pass.
- Parallel lines: Walk straight, turn, and repeat—covers more ground than trail-hopping.
Pro Move: “Walk an entire side hill or ridge top… you’ll find sheds in odd places,” says a veteran hunter.
Train Your Eyes to Spot Tine Tips
Most sheds are found by seeing small white fragments, not full racks. Master these visual tricks:
- Scan for “white” among brown leaves, snow, or grass.
- Look backward—many sheds are missed behind you.
- Change your angle: Crouch, stand on a log, or shift position.
- Use binoculars: Glass open fields from a distance. “Let the glass do the walking,” one hunter advises.
Stop every 200 yards and do a 360° scan. Many sheds lie within 10–20 feet of your path.
Mindset Shift: Don’t just look—see. Train your brain to spot unnatural shapes.
Optimize Conditions: Hunt When the Odds Are Best
Best Weather and Light for Shed Hunting
| Condition | Why It Works |
|---|---|
| Overcast or rainy days | Dark background makes white antlers stand out |
| After light rain | Wet sheds glisten and reflect light |
| Golden hour (dawn/dusk) | Low sun creates shadows that highlight shapes |
| Post-snowmelt | Reveals sheds buried under snow |
Avoid bright, sunny days—glare and long shadows hide antlers.
Real Experience: “Antlers almost always seem to shine a little brighter during or just after a bit of rainfall,” notes a Midwest hunter.
Gear Up for Success
You don’t need much, but the right gear saves time and prevents injury.
Essential Field Equipment
- Binoculars (8x–10x): Scan fields and verify distant objects.
- Hiking boots with gaiters: Protect from snow, mud, and ticks.
- Chaps or brush pants: Crucial in briars and thorn patches.
- Leather gloves: Prevent cuts in dense brush.
- Backpack: Carry water, snacks, and recovered sheds.
- Headlamp: Extend your hunt if daylight runs short.
Safety First: In bear country, carry bear spray, a firearm, and a satellite communicator (e.g., Garmin inReach).
Use Technology to Your Advantage
![]()
- onX Hunt / HuntStand / Drury Outdoors: Map property lines, mark finds, plan grids.
- TerrainX (onX Elite): Filter maps by slope aspect—perfect for south-facing beds.
- ScoutLook Weather: Check wind, temp, and moon phase before heading out.
- Trail cameras: Monitor deer movement and determine when bucks shed.
Pro Move: Place cameras near food sources post-rut to track antler retention.
Advanced Tactics for Serious Hunters
Hunt With a Shed Dog
A trained dog covers 5x more ground than a human. Top breeds include:
– Labrador Retrievers
– Golden Retrievers
– German Shorthairs
– Weimaraners
Start training at 8–12 weeks old, use real or synthetic antler scent, and reward with treats—never let pups chew the shed.
Real Data: One public land hunter said, “I put on 32 miles between finds.” A dog could’ve cut that in half.
Use Vehicles Wisely
ATVs and trucks aren’t cheating—they’re efficient.
- ATVs/UTVs: Cover large agricultural fields fast.
- Roadside scanning: Drive slowly and glass ditches and culverts.
- Truck-top vantage points: Glass fields from elevated positions.
Tip: “Use an ATV or UTV, especially for open-area early dropping sheds.”
Know Regional Differences
Northeast & Midwest
- Focus on CRP fields, pine ridges, and ag edges.
- Wait until 60% snowmelt before intensive searching.
- Use trail cameras to track movement.
Southeast
- Milder winters = deer stay in fall ranges.
- Search thick cover, staging areas, and green fields.
- Focus on narrow “tunnels” between thickets.
Western & Southwest
- Glassing is key: Use high vantage points.
- Target south-facing slopes with cover and feed.
- Follow water sources and game trails.
- In mountains, drop 30 yards off ridgelines—less traffic, more sheds.
Expert Move: “Instead of walking a ridgeline, drop off 30 yards,” says Steven Drake (MT).
Find the Matching Antler
Not all bucks drop both antlers at once. Some keep one side for days.
After finding one shed:
1. Conduct a 10–15 minute concentric circle search (expand to 70–100 yards).
2. Follow travel routes in both directions.
3. Revisit in 3–5 days—the second antler may not have dropped yet.
Honest Truth: “If it’s not within 100 yards, it could be anywhere.”
Follow Ethical Rules
Know the Law
Shed hunting is regulated in some states:
- Montana, Wyoming, Nevada, Kansas, Delaware, Louisiana: Have seasonal restrictions.
- Utah: Requires a mandatory ethics course.
- National Forests & BLM Lands: Some close during critical wildlife recovery periods.
Golden Rule: If unsure, assume the area is closed.
Practice Wildlife Ethics
- Don’t push deer off bedding areas.
- Give deer space—circle wide if you spot one.
- Avoid winter refuges where deer conserve energy.
- Stay on trails to minimize habitat damage.
Master the Shed Hunting Mindset
Stay Patient and Persistent
Even experts go weeks without finds. One hunter found only six sheds in a full season despite daily effort. Success often comes in bursts—“magical days” after long droughts.
Community Wisdom: “You might go weeks without finding one,” says a veteran.
Treat shed hunting as:
– Scouting: Learn deer movement and bedding zones.
– Fitness: Build stamina for hunting season.
– Mental reset: Enjoy nature, not just the harvest.
Honest Take: “I set my expectations low and enjoy the beautiful hikes.”
Final Checklist: Maximize Your Finds
✅ Time It Right
– Public land: Start January
– Private land: Wait until mid-February
– Target post-snowmelt and overcast days
✅ Go Where Sheds Are
– Focus on food, bedding, and choke points
– Hit south-facing slopes and conifer cover
– Use apps to map high-use zones
✅ Search Like a Pro
– Walk slow, scan often, use binoculars
– Grid-search hotspots; revisit often
– Train your eyes to spot tine tips
✅ Gear Smart
– Binoculars, brush pants, gloves, backpack
– GPS app with waypoints
– Consider a shed dog
✅ Stay Ethical
– Know local laws
– Avoid stressing deer
– Carry safety gear in remote zones
✅ Keep the Right Mindset
– Expect low yields—patience wins
– Treat it as scouting and adventure
– Persistence pays off over time
Bonus Tips from Real Hunters
– Label sheds: Write property code and date on the base.
– Train your eyes: Hide a shed and practice finding it.
– Check urban edges: Easements behind stores are under-searched.
– Look for “white”: Focus on bone-colored objects.
– Note roadkill: Reveals active deer corridors.
Final Thought: “Shed hunting is more than a treasure hunt—it’s a deep dive into deer ecology.”
Now grab your boots, pack your binos, and hit the woods. The next shed is waiting—you just have to see it.


0 Comments